• Please use real names.

    Greetings to all who have registered to OPF and those guests taking a look around. Please use real names. Registrations with fictitious names will not be processed. REAL NAMES ONLY will be processed

    Firstname Lastname

    Register

    We are a courteous and supportive community. No need to hide behind an alia. If you have a genuine need for privacy/secrecy then let me know!
  • Welcome to the new site. Here's a thread about the update where you can post your feedback, ask questions or spot those nasty bugs!

Correcting CA

Michael Fontana

pro member
How are you guys correcting CA?

I found the best methode - in term of quality, to have a 2nd layer in PS, turn its blending to color, and stamp CA back... but it can be a time-consuming task.

I don't like PS-CS-2' s CA-filter to much, as it blurs the entire image.

Off course, best of all would be to have CA-free- lenses - but its a dream..

Any hints?
 

nicolas claris

OPF Co-founder/Administrator
I use "Color Fringe Reducer 5" in manual mode to choose the color or use auto for purple fringe, and erase if needed on the layer created by the plugin.

You may buy it for 10$ there

best of all would be to have CA-free- lenses - but its a dream
I second that!
 

Tim Armes

New member
Hi Michael,

The best time to fix CA is at the RAW development stage. Camera RAW or LR (I think...) have sliders to allow you to scale the red/green or blue/yellow channels. You adjust them until the CA disappears.

I have never found a pure Photoshop method for doing this.

Tim
 

nicolas claris

OPF Co-founder/Administrator
Tim Armes said:
The best time to fix CA is at the RAW development stage. Camera RAW or LR (I think...) have sliders to allow you to scale the red/green or blue/yellow channels. You adjust them until the CA disappears.
Hi Tim

this has NEVER worked for me, not in ACR, not in LR, neither in beta ACR/CS3... too bad!

Only DxO does, but then you have to save as DNG in order to open the raw in another RC. Too long!

C1 does an average job, I don't know about Bible nor Sylkipix

The better and fastest for me is using LR or C1 then Color Fringe Reducer 5" on 16 bits files..
 

Tim Armes

New member
Hi Nicolas,

I'm suprised that the ACR tool hasn't worked for you. In what way does it not do as you expect?

I'll try to take a look at the Color Fringe tool to compare the results.

Regards,

Tim
 

Tim Armes

New member
I take that back, since there's no trial version I shan't be testing it.

I'd be interested in knowing how it works however. CA is caused by the lens deforming certain wavelengths more than others. Grossly stated, the red/green channel may actually be bigger or smaller than the rest of the image, for example.

The RAW converter can be used to resize the channel to correct the CA. Techniques that try to mask out or recolourise the fringing rather than correcting for the CA itself are normally much less convincing. How does this tool do its job?

Tim
 

Michael Fontana

pro member
One of the big problems with CA looks to me, that it's not consistent; therefore , the exactly same lens shows different CA-behaviour - depending on the light situations, aka back- vs frontlight, flares, different objects and materials, (glossy metal vs wood!!), intensity of contrast, etc.
I never really could understand this fully.

The ACR's CA-"filter" didn't delighted me either.
Apart from the fact, that I like others RC more, its CA-correction did a bit of a job, but not for my full saddisfaction. I alwith had to use the PS- method by hand, too.

Ok, I might be pixelpeeping, but the job requires to get the best possible out of the shots. That means CA-free images. And if somone is HDR-ing, or blending different (bracket) exposures, this can become a hassle.

Nicolas,
I had Color Fringe Reducer - or a similar action in a previous version - tested, maybe it was freeware then, I only remember the picture of the branch -
- how it worked out?
 
The problem with any CA correction tool is that sometimes you have to
convert/correct 2 times the images, one for objects with CA one the left side and
another for objects on the right side(cam be up and down), then mix the images
keeping the good sides, or use 3 images, one not corrected and the other 2 with the
corrections left and right, with PhotoShop layer masks + brush mix the images :)
 

Asher Kelman

OPF Owner/Editor-in-Chief
Luiz Vasconcellos said:
The problem with any CA correction tool is that sometimes you have to
convert/correct 2 times the images, one for objects with CA one the left side and
another for objects on the right side(cam be up and down), then mix the images
keeping the good sides, or use 3 images, one not corrected and the other 2 with the
corrections left and right, with PhotoShop layer masks + brush mix the images :)

Why twice, Luiz?

If the software knows your lens, then one pass should be sufficient! Not?

Asher
 
Michael,

while CA/PF can be a problem sometimes (I used to own a copy of Sony 828, which was probably the most PF-prone camera ever made:), the fixes are usually so easy that I really lost my interest to the whole problem a long time ago (i.e. since I learned how to deal with it simply and effectively).

Here's an example I wrote about two years or so ago.

Original shot (828):

11464377-L.jpg


As you can see - classic CA/PF case, direct shot towards the sun though the heavy foliage.
However, just a minute in PS, and you'll get this (central crop):

11462328-L.jpg


I even wrote an action at the time, but I don't even think I used it much. First, I learned to avoid the problem, second, I switched to Canon DSLR, where this effect is not that pronounced, and finally, I can fix it almost with my eyes closed in a matter of few seconds. I'm not even speaking of RAW...

So, let me stop blowing my own horn and ask you: what would be your particular example of a very nasty CA/PF that you are looking to get rid of and not sure how?
 
Tim,

Tim Armes said:
Hi Nik,
Would you mind detailing the technique that you use?
Tim

Not at all. Here's an excerpt from the original STF thread.

Hue/Saturation, desaturate magentas and cyans, if it does not help - desaturate blues, too. As far as skies are already washed out in this kind of shots, and the foliage does not contain a lot of those hues, you have practically nothing to lose!
Another approach may be to change those PF-originating hues to those which a dominant to the picture, along with some desaturation and certain level of dimming.
All in all, it took me just a few seconds to salvage a shot, which otherwise would be a PF showcase.
Hope you like the idea!

For more details, please check the aforementioned thread, and please keep in mind that in PS there are always at least ten ways "to skin a cat" :)
 

Tim Armes

New member
Hi Nik,

The technique is effectively quick and easy. However, rather than correcting the CA you're simply removing the colour from the fringes, they'll still be there, just as grey bands. As you note, this will also have an effect on the surrounding colours, even if it's it's very limited in foilage. I wouldn't consider this acceptable for a high quality print, although for a quick fix and/or small print size, it may be okay.

I'm still voting for correction at the RAW stage. I agree that there may be cases we're a few difference corrections may need to be applied and then merged, so it can occasionally be longer.

Tim
 
Tim,

Tim Armes said:
Hi Nik,

The technique is effectively quick and easy. However, rather than correcting the CA you're simply removing the colour from the fringes, they'll still be there, just as grey bands. As you note, this will also have an effect on the surrounding colours, even if it's it's very limited in foilage. I wouldn't consider this acceptable for a high quality print, although for a quick fix and/or small print size, it may be okay.

I'm still voting for correction at the RAW stage. I agree that there may be cases we're a few difference corrections may need to be applied and then merged, so it can occasionally be longer.

Tim

I agree with you that this technique, while covering the basics needed to salvage a 4x6 family snapshot, can hardly be recommended for the gallery quality poster. However, allow me to retort.

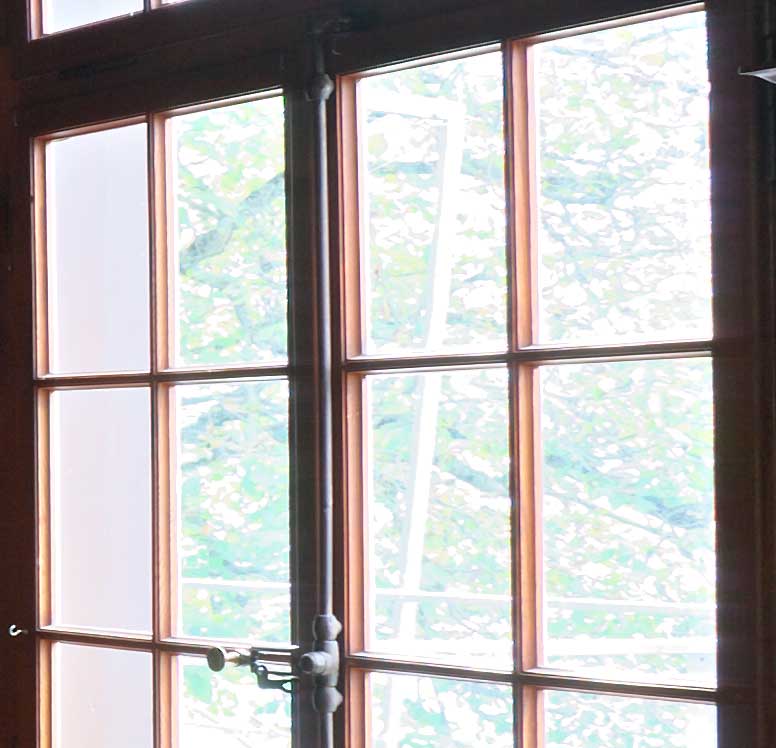
First of all, the work of that scale shall not be shot with the P&S and, most likely, with any zoom lens. I'm not particularly keen on MF and LF cameras, but I know enough of optics to understand the correlation between the amount of CA, size of the sensor and the complexity of the lens. Primes, been the simplest of them all, are by default way less prone to CA than any zoom lens can possibly be.
So, to get our image Getty-worth we shoot with a large sensor and we shoot with a high quality prime, And, of course, we shoot RAW. And we probably should not shoot directly towards the sun through the heavy foliage.:)

Now, with all that said and implemented, by the sheer law of optics, sometimes you still can get some CA. How to get rid of it?

The technique I mentioned in my first post was "devised" by me at a time when I barely knew what a layer is and had absolutely no idea of what to do with channels, LAB, Blend-If sliders and other nice features of PS that I'm currently using on a daily basis without even thinking much. Of course it was very limited and had some obvious sideeffects.

Nowadays, however, given my current level of knowledge of PS and color correction process as a whole (which is far below Dan Margulis, I should say:) I think I can get rid of CA in 99% of cases without spending more than a few minutes in the worst case scenario. Solutions will be different and depend on the image at hand. But they will present itself.

I guess all I'm trying to say is that CA is not a problem for a person who understands what causes it, knows how to avoid it in a first place, and feels comfortable with advanced PS tools to deal with it in case it shows it purple face.

And for those who does not - my two year old childish technique would probably do just fine:).
 

Michael Fontana

pro member
Nik, if you' ve a easy workarround, that's very good!!

Some bracket shots - with the 1 Ds-2 and 17-40 (I know, that lens has CA - and I'm looking to replace it..) later on, these are used for HDR with the Photomatix-software:

shots-for-HDR.jpg


dark wood inside, high contrasted to the window's light, plus a lake - 20 meters away from the window - which btw produces a own quality of light/reflections....

I've uploaded one of the RAWs, ctrl-klick for download, as not all the browsers like RAWs.
As this is a assignement-file, I will not let it too long on the server...

http://imago.macbay.de/OPF/Test_CA.CR2
 
Michael,

Michael Fontana said:
Nik, if you' ve a easy workarround, that's very good!!

....

I've uploaded one of the RAWs, ctrl-klick for download, as not all the browsers like RAWs.
As this is a assignement-file, I will not let it too long on the server...

http://imago.macbay.de/OPF/Test_CA.CR2

I will play with it tonight, if you can leave it online until that time (8 pm Pacific time)..

BTW, I agree, this particular setup is very prone to generating CA no matter what you use. Bracketing and RAW should definitely help, though
 

Asher Kelman

OPF Owner/Editor-in-Chief
Asher Kelman said:
Why twice, Luiz?

If the software knows your lens, then one pass should be sufficient! Not?

Asher


Luiz Vasconcellos said:
No, sometimes you correct one side, but the other gets worst...

Well, Luiz, then, obviously the software doesn't know your lens! :)

In a new Hasselblad H3, the camera software will know the lens and hopefully, at least here, the CA should be vanquished.

Today, all lenses should be profiled for autocorrection in RAW.

However, we are only just begining to do that.] with lesser cameras.

Asher
 

Michael Fontana

pro member
Nikolai Sklobovsky said:
I will play with it tonight, if you can leave it online until that time (8 pm Pacific time)..

BTW, I agree, this particular setup is very prone to generating CA no matter what you use. Bracketing and RAW should definitely help, though


No problem, I' ll leave it for some time on the server

I'm adding a screenie-crop from the finished image, after HDR-ing, and time-consuming manual CA-correction.

test-CA_fin.jpg
 
Asher Kelman said:
Well, Luiz, then, obviously the software doesn't know your lens! :)

In a new Hasselblad H3, the camera software will know the lens and hopefully, at least here, the CA should be vanquished.
Today, all lenses should be profiled for autocorrection in RAW.
However, we are only just begining to do that.] with lesser cameras.
Asher

That is it then, unknow lens...
By the price that gen costs better have no CA :)
 
Michael, here you go

Michael Fontana said:
Nik, if you' ve a easy workarround, that's very good!!

Some bracket shots - with the 1 Ds-2 and 17-40 (I know, that lens has CA - and I'm looking to replace it..) later on, these are used for HDR with the Photomatix-software:

dark wood inside, high contrasted to the window's light, plus a lake - 20 meters away from the window - which btw produces a own quality of light/reflections....

Since CA only affected a limited area, I focused only on a sample to speed the things up. The result would be identical even if I worked on the whole image.

First of all - before and after shots:

BEFORE: 100% crop of the original:

117884243-O.jpg


As it easy to see, it displays certain amount of PF on the edge of the windows

AFTER: 100% crop fixed:

117884225-O.jpg


What I did:
  1. ACR: CA fix: Red/Magenta: -25, yellow/cyan: + 25

    The rest was done in PS. I used CS3, but it should be the same even in 7
  2. Copy layer (Ctrl+J)
  3. Filter Find Edges
  4. Threshold to make edges distinctive and make it purely bw
  5. SelectAll/Copy (Ctrl+A, Ctrl+C)
  6. Make another copy of the background (Ctrl+J), add a mask to it
  7. Alt-click the mask for direct mask editing
  8. Paste (Ctrl+V)
  9. Invert (Ctrl+I)
  10. Work with the brush to make sure nothing but window edges is selected (not much is, so it's a very easy step)
  11. Apply Mask
  12. Ctrl+Click this thinly lined layer to load it as a selection
  13. Hue/Saturation: Colorize, Hue:0, Saturation:15, Lightness: -35
  14. That's all!
Honestly, doing all that is faster than typing it...

I'm not saying it's the easiest, the fastest or the best way to do it. However, I think it worked in this case and it's OK by my book...:)

HTH
 
Last edited:

StuartRae

New member
Here's a crop from the straight RSP conversion. Not too bad to begin with.

Test_CA_Crop_RSP.jpg


Here's the crop with the CA transformation in Picture Window Pro.

Test_CA_Crop_PWP.jpg


And here's the whole thing (CA not corrected) from RSP with a touch of Shadow Illuminator.

Test_CA-01.jpg


Regards,

Stuart
 
A sample of using the semiautomatic aberration tool in SP3. You draw a rectangle around a edge that's as perpendicular as possible against a line through the centre of the image and the correction is calculated using the chosen edge.
Sample using the right edge of the window:
328498681_194367b2d0_o.jpg


Complete image:
328498683_ae35e47368_o.jpg


I guess DxO will do at least as good fully automatic but I don't have the Elite licence for the 1Ds 2.
BR/ Stefan
 

Asher Kelman

OPF Owner/Editor-in-Chief
Off topic, but, since it is such a great room, with these glorious wood tones, why not finish it with some orthogonality!

The ceiling appears twisted!

Also, can the table top might be enriched in tonality and some shadows of the wood frames made by light flooding the room from the windows?


Asher
 

Michael Fontana

pro member
Asher Kelman said:
Off topic, but, since it is such a great room, with these glorious wood tones, why not finish it with some orthogonality!

The ceiling appears twisted!

Also, can the table top might be enriched in tonality and some shadows of the wood frames made by light flooding the room from the windows?


Asher

You' re right, Asher. If I remember correctly, it was impossible to set the tripod more to the right side.... therefore I changed the perspectiv in PS later. So this is the finished - delivered - shot:

finished.jpg
 

Michael Fontana

pro member
Thanks a lot, Nikolai and the rest; I appreciate your help very much. I wasn't aware of the Threshold, as you used it, very smart! I translated the steps in my language, and replaced the Ctrl-key by the apple-key - for the macs.

Now, the crop, as it came out of RAW Developer, it hasn't - yet - any build-in CA correction; therefore more CA is visible than with ACR.

crop--after-RC.jpg


Stefan, what do you intend by SP3?
BTW: Great place, here, thanks Asher and the other mods for building up this forum and keeping it alive.
 

Michael Fontana

pro member
Thanks, I thought so, but wasn't really sure...

I've been trying to make a action out of Nikolai's steps, it works fine when writing it it; but PS-CS-2 doesn't seems to record correctly the 7th step: >Alt-click the mask for direct mask editing<
My localised PS creates a new layer, (Layer 3) when pasting (Step 8) - instead of copying in the layermaks.
 
Michael,

Michael Fontana said:
Thanks, I thought so, but wasn't really sure...

I've been trying to make a action out of Nikolai's steps, it works fine when writing it it; but PS-CS-2 doesn't seems to record correctly the 7th step: >Alt-click the mask for direct mask editing<
My localised PS creates a new layer, (Layer 3) when pasting (Step 8) - instead of copying in the layermaks.

it could be my fault. When copying, instead of copying the whole image, copy just one channal (in RGB they all identical). THis will create a true BW image in the clipboard which the you can paste into mask.

Alt+Click works in PS/PS2 for sure...
 
Top