
-
Please use real names.
Greetings to all who have registered to OPF and those guests taking a look around. Please use real names. Registrations with fictitious names will not be processed. REAL NAMES ONLY will be processed
Firstname Lastname
Register
We are a courteous and supportive community. No need to hide behind an alia. If you have a genuine need for privacy/secrecy then let me know! -
Welcome to the new site. Here's a thread about the update where you can post your feedback, ask questions or spot those nasty bugs!
You are using an out of date browser. It may not display this or other websites correctly.
You should upgrade or use an alternative browser.
You should upgrade or use an alternative browser.
Challenge: Fall Color, coming to a place near you! Don't miss it! Share here!
- Thread starter Ron Morse
- Start date


Asher Kelman
OPF Owner/Editor-in-Chief
Hi Ron,
As you may have noticed from my previous exhanges on color, I think it is a difficult set of parameters to work with for man-made objects. The wonderful pictures with models are color coordinated with great effort and expense.
Here, however, you have the hand of heaven working for you! The color, therefore, must be celebrated now .............but you must remain sober. You cannot get drunk on its glory and ignore composition. Already right now, the color is perfect for major effort. Thought, planning and care will get you stunning and memorable images.
Some limited suggestions,
Don't settle for casual snapshot or wait for better color.
I'm inspired, so you now have a challenge!
Who am I telling you what to do? You already know all this!
Enjoy!
Asher
Unfortunately for us in California, the deciduous trees are not as abundant. Hopefully, someone will post places where we might see something of what is before you right now!
As you may have noticed from my previous exhanges on color, I think it is a difficult set of parameters to work with for man-made objects. The wonderful pictures with models are color coordinated with great effort and expense.
Here, however, you have the hand of heaven working for you! The color, therefore, must be celebrated now .............but you must remain sober. You cannot get drunk on its glory and ignore composition. Already right now, the color is perfect for major effort. Thought, planning and care will get you stunning and memorable images.
Some limited suggestions,
- Get somewhere you have the ability to scout, hunt and choose your scene.
- You can include some of man's structures or people, but then there is an extra level of care needed. However, if you look at Steve's work with his Leica M8 in New York Central Park, it's well worth it! In fact this maybe the highest level of work you will ever produce.
- Close ups of leaves or expanses of leaves like oceans make good subjects
- Landscape with strikingly unique waves of color and texture and the light at an angel and especially the golden glow of the setting sun.
Don't settle for casual snapshot or wait for better color.
I'm inspired, so you now have a challenge!
Who am I telling you what to do? You already know all this!
Enjoy!
Asher
Unfortunately for us in California, the deciduous trees are not as abundant. Hopefully, someone will post places where we might see something of what is before you right now!
Hi Asher,
What this was all about was just something with a lot of color to try the old 18-55 kit lense on with the 40D. My favorite walkaround lense on the 20D a Tamron 24-135 is horrible on the 40D, just about unusable with noise. Every other lense work fine. So until I can decide what to get I thought I'd give the kit lense a try. I noticed the color really coming on in the trees and thought it would be a good test.
How do you think the EF-S 18-55 did? It is raining off and on with very overcast skys.
If the weather is good Monday my cousin and I are going to spend a day in the field hunting for colors and wildlife.
Asher Kelman
OPF Owner/Editor-in-Chief
Hi Ron,
The lens is fine! Just stop down to at least 5.6 or f8.
Of course if you can pick up a Contax 28 mm f 2.8 Distagon and an adapter, you will have a stunning system. Nothing will be better that you can add to your camera, although a Leica, Olympus or Nikon lens would be as good but different.
However, as is, your are well equipped. The biggest part is you!
Asher
Asher Kelman
OPF Owner/Editor-in-Chief
So, it's now october and we should have great fall colors or carpets of leaves and old men sitting on benches. Are you all sitting at home! Even pine cones would be fine!!
Asher
Asher
Marian Howell
New member
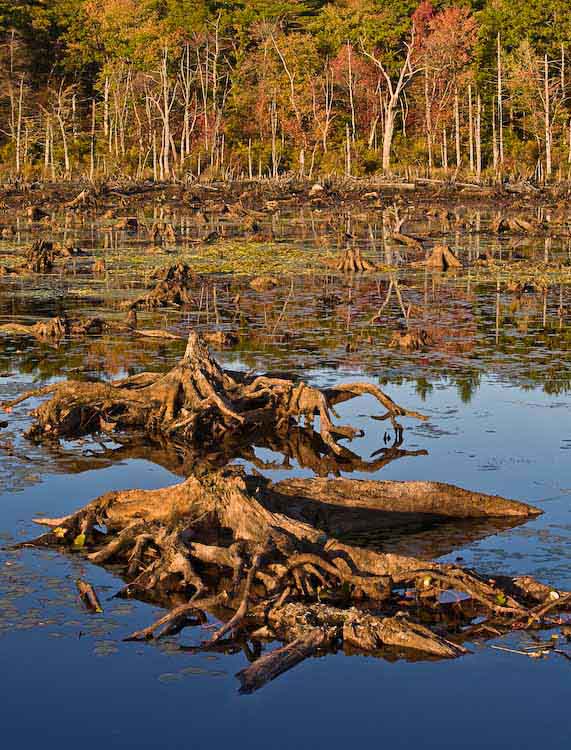
the water in the bog has been diverted for flooding the cranberry bogs for harvest, and we have a drought...
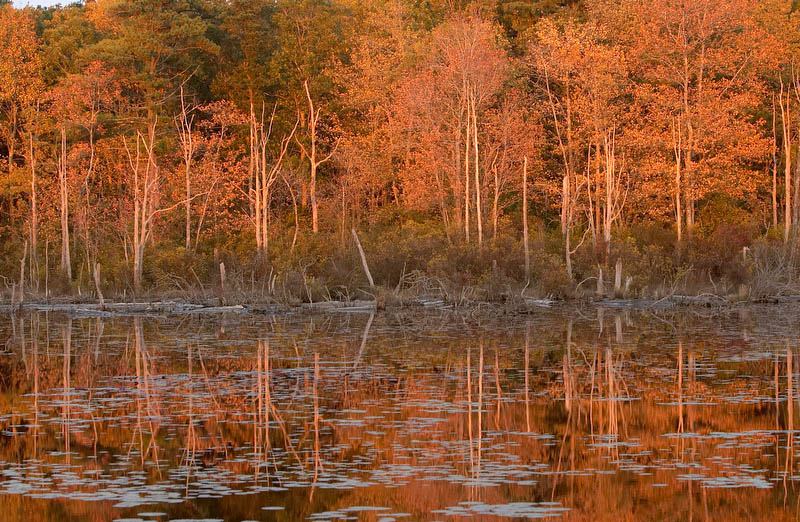
but fall sunsets can still be magic...
but fall sunsets can still be magic...
Asher Kelman
OPF Owner/Editor-in-Chief
Marion, what great light!
That scene has so much potential. Could go taller or wide. Endless great possible compositions. My gosh, could spend ages there!
Is this near you! What a gold mine for pictures!
What's the issue with stealing some of the water? These trees are already dead. What is at risk?
Asher
That scene has so much potential. Could go taller or wide. Endless great possible compositions. My gosh, could spend ages there!
Is this near you! What a gold mine for pictures!
What's the issue with stealing some of the water? These trees are already dead. What is at risk?
Asher
Marian Howell
New member
this place is right in my small town (15 square miles). i've got taller, i've got wider, i've got many images of it! i *do* spend ages there LOL!! actually, it's part of my job ") as the photographer for the local lands trust, who purchased this property 2 years ago.
as the photographer for the local lands trust, who purchased this property 2 years ago.
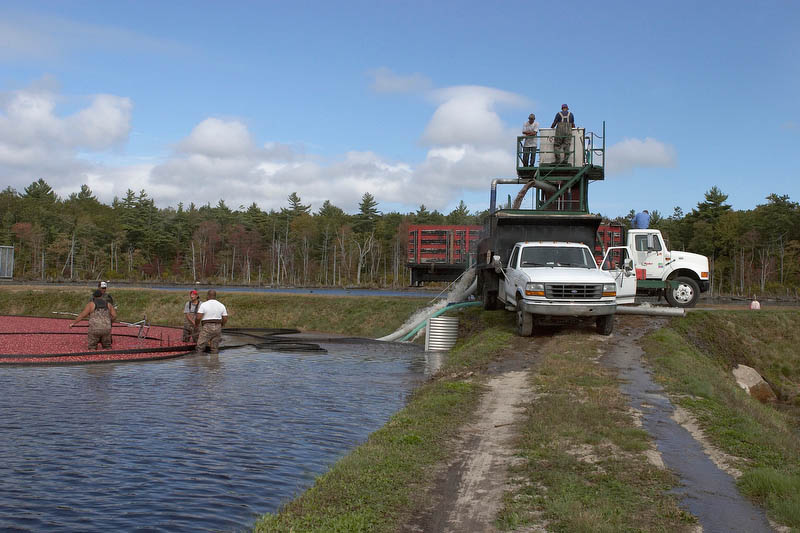
the cranberry bogs, in addition to irrigation for growth, have to be flooded each fall for the harvest. cranberries float, and are gathered to a corner of the bog on the water surface, where they are then sucked up into truck beds for hauling away. it's a very water intensive agriculture. so it's handy to be in bogs/swamps/low water table areas. the growers spend a lot of time controlling the flow of water around and through their crop. this particular bog is about 90 years old, and before that it was called "rocky bog" because, well, it had alot of rocks in it the actual cranberry bogs are behind my back in this shot. when the cranberry bog was created the water from that boggy area was diverted to create this lake next it which is controlled by dams. that way, when he needs water for the bogs it's right there. the water level should be down since we've just finished the harvest, but not this low...and this is all part of the greater watershed area and it means out streams and rivers are pretty low too
but we might get some rain tomorrow) probably not enough though.
as the photographer for the local lands trust, who purchased this property 2 years ago.the cranberry bogs, in addition to irrigation for growth, have to be flooded each fall for the harvest. cranberries float, and are gathered to a corner of the bog on the water surface, where they are then sucked up into truck beds for hauling away. it's a very water intensive agriculture. so it's handy to be in bogs/swamps/low water table areas. the growers spend a lot of time controlling the flow of water around and through their crop. this particular bog is about 90 years old, and before that it was called "rocky bog" because, well, it had alot of rocks in it
the actual cranberry bogs are behind my back in this shot. when the cranberry bog was created the water from that boggy area was diverted to create this lake next it which is controlled by dams. that way, when he needs water for the bogs it's right there. the water level should be down since we've just finished the harvest, but not this low...and this is all part of the greater watershed area and it means out streams and rivers are pretty low too but we might get some rain tomorrow
) probably not enough though.Asher Kelman
OPF Owner/Editor-in-Chief
the photographer for the local lands trust,
.
- flooded each fall for the harvest.
- cranberries float,
- gathered to a corner of the bog on the water surface,
- where they are then sucked up into truck beds for hauling away.
So, where are the pictures! As I said, this is a goldmine. I think you should have a book on it!!
Asher
Marian Howell
New member
i'm not sure i'm ready for a book on cranberry harvesting LOL!
here's that same bog with water in it 2 years ago:
you asked about the cranberry harvest though...
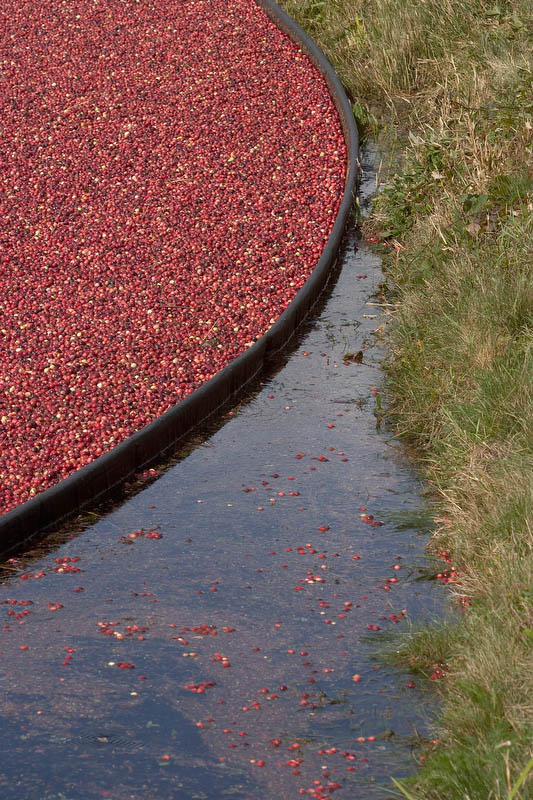
here's the same bog as the sunset shot 2 years ago during the harvest:
so even though the cranberry bogs next door were flooded at the time there was alot of water still where now are only tree stumps.
and here's a shot to illustrate the harvesting process:
the full gallery which shows that harvest is here:
http://www.pbase.com/capecodfish/whiteeagle_early_berries
i keep forgetting that only a couple of places in the country grow cranberries)) my bad!
enjoy, from the land of the first thanksgiving!
here's that same bog with water in it 2 years ago:
you asked about the cranberry harvest though...
here's the same bog as the sunset shot 2 years ago during the harvest:
so even though the cranberry bogs next door were flooded at the time there was alot of water still where now are only tree stumps.
and here's a shot to illustrate the harvesting process:
the full gallery which shows that harvest is here:
http://www.pbase.com/capecodfish/whiteeagle_early_berries
i keep forgetting that only a couple of places in the country grow cranberries
)) my bad!enjoy, from the land of the first thanksgiving!
Asher Kelman
OPF Owner/Editor-in-Chief
Marion,
These are so beautiful!
Thev frirst as it is, the second with some work, the 3rd perhaps in B&W!
I'm so amazed at the rich potential!!! Wow!
At least a 2008 calendar from Lulu. Ask Nikolai about it, you can search that here.
Asher
These are so beautiful!
Thev frirst as it is, the second with some work, the 3rd perhaps in B&W!
I'm so amazed at the rich potential!!! Wow!
At least a 2008 calendar from Lulu. Ask Nikolai about it, you can search that here.
Asher
Marian Howell
New member
thanks asher for the kind words.
we've been doing calendars for several years, and the first has already been used! the other harvest shots are in the gallery for use as needed by the lands trust and other clients, so they get finished at that time.
it's good to know another photographer saw the joy in this spot as well i keep finding excuses to go back alot!
we've been doing calendars for several years, and the first has already been used! the other harvest shots are in the gallery for use as needed by the lands trust and other clients, so they get finished at that time.
it's good to know another photographer saw the joy in this spot as well
i keep finding excuses to go back alot!


Marian Howell
New member
that first one is excellent ron! i love the saturated colors during rain )
the windy curves of the waterway lead nicely through the image. the best part of the sky for me is the darkness against the trees. since there's not much happening in the upper bit of sky i suggest tightening the crop at the top down to at least the tops (if not lower) of the trees on the right. did you shoot a portrait of this by any chance with more foreground? or was there no more foreground to be had?
what lens were you using?
)the windy curves of the waterway lead nicely through the image. the best part of the sky for me is the darkness against the trees. since there's not much happening in the upper bit of sky i suggest tightening the crop at the top down to at least the tops (if not lower) of the trees on the right. did you shoot a portrait of this by any chance with more foreground? or was there no more foreground to be had?
what lens were you using?
janet Smith
pro member
Hello Marian
Love the one of the bogland with the tree roots, I like the contrast in texture between the roots and the still water, works wonderfully. I also like the one of the same area 2 years ago, such beautiful saturated colours, looks like you live in a beautiful area.
Love the one of the bogland with the tree roots, I like the contrast in texture between the roots and the still water, works wonderfully. I also like the one of the same area 2 years ago, such beautiful saturated colours, looks like you live in a beautiful area.
Asher Kelman
OPF Owner/Editor-in-Chief
Ron,
I can see you could start your own Cranberry farm too! Look perfect! All you need is a bunch of equipment and a cranberry starter kit!
What lenses are you guys using? Looks like this is where the new 14mm Canon would be wonderful!
Asher
I can see you could start your own Cranberry farm too! Look perfect! All you need is a bunch of equipment and a cranberry starter kit!
What lenses are you guys using? Looks like this is where the new 14mm Canon would be wonderful!
Asher
that first one is excellent ron! i love the saturated colors during rain
the windy curves of the waterway lead nicely through the image. the best part of the sky for me is the darkness against the trees. since there's not much happening in the upper bit of sky i suggest tightening the crop at the top down to at least the tops (if not lower) of the trees on the right. did you shoot a portrait of this by any chance with more foreground? or was there no more foreground to be had?
what lens were you using?
Thanks Marion,
I see your point about the sky and agree.
I could have gained a little more foreground but their was a bright place in the dark sky that blew out the sky if I moved from behind a tree.
The lense was a tamron 17-50. Optically very good but no IS. From what little I have used it I am very happy.
Ron,
I can see you could start your own Cranberry farm too! Look perfect! All you need is a bunch of equipment and a cranberry starter kit!
What lenses are you guys using? Looks like this is where the new 14mm Canon would be wonderful!
Asher
Actually they have experimented with growing cranberrys in different parts of the state. I don't know if they still grow any or not.
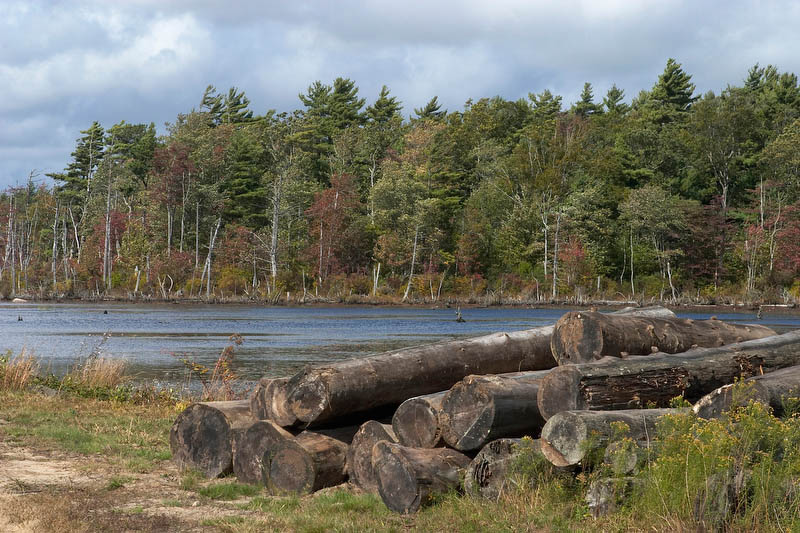
This place is 1.6 miles through the woods by GPS from my home. About 8-10 miles by road.
The lense was a tamron 17-50.
If I had stepped back much I would have been in the middle of this.

This is a recreated lumbering community from the 1790s built on original stone foundations. They have a working water powered sawmill along with a lot of other neat stuff.
http://www.leonardsmills.com/livinghist.html
This is a recreated lumbering community from the 1790s built on original stone foundations. They have a working water powered sawmill along with a lot of other neat stuff.
http://www.leonardsmills.com/livinghist.html
Last edited:
Marian Howell
New member
If I had stepped back much I would have been in the middle of this.
that's usually the case LOL!
anyway, your options then to extend the foreground are to adjust the shot position or change lenses, and sometimes there just isn't an elegant solution that we like
( and you just take another shot altogetheron the bright side, that location looks good for other shots
)Asher Kelman
OPF Owner/Editor-in-Chief
This is where T/S lenses or LF comes in handy!
Asher
Asher
Georg R. Baumann
Inactive
no where near close to your stunning examples here, well, anyhow, here is a shot from today

janet Smith
pro member
Hello Georg
Love the windswept Marram Grass and foaming sea, beautiful composition, I also really like the way you've framed it, works for me!
Love the windswept Marram Grass and foaming sea, beautiful composition, I also really like the way you've framed it, works for me!
Georg R. Baumann
Inactive
Hi Jan,
The original is sorta big, the PSD file was in excess of 1 Gb.
The original is sorta big, the PSD file was in excess of 1 Gb.
janet Smith
pro member
The original is sorta big, the PSD file was in excess of 1 Gb.
Hi Georg
Certainly is a big one - why so? is it a merge of several that you've stitched, what camera/lens are you using? anyway, looking great.....
Georg R. Baumann
Inactive
yup it is a merge from 81 shots. I have a olympus E1.
Marian Howell
New member
yup it is a merge from 81 shots.
89 shots !!!
how long did it take to shoot? you did a fabulous job with the stitch - what method did you use??
tell us some more about it please
))janet Smith
pro member
yup it is a merge from 81 shots
Hi Georg
81!!! I've never heard of a stitch from so many shots, that must have taken some doing, how long did it take you and what software did you use??
Georg R. Baumann
Inactive
I probably told that wrong, excuse the misunderstanding. I try....
It is 27 stitched shots. However for each single I took exposure brackets of 2s/4s/8s, hence 27x3=81.
Then I developed in packages of three, 1 shot 3 exposures in ACR. This shot I further processed in Photomatix with very subtle tonemapping settings.
After all 27 had been processed, I used photoshop and photomerge to allign and blend them together. (It is not perfect, but for a quick and dirty job allright)
Then I flattened the Layers and converted the remaining single one into a smart object. Then applied some further shadow highlight filter independantly to selected areas.
The way that works is that for example you choose the sky and draw a selection, refine the edge and then apply shadow/highlight as you see fit.
You will see that under this layer the smart filter has been applied and a mask was created. With that layer activated, hold down CRTL and press J to copy the layer including the smart filter. You'll see that the exact layer including smart filter has been copied.
Now go back to the original Layer and hold down CTRL and click once onto the filter mask beside the shadow highlight filter to select it. Then create a new layer mask with the little button on the bottom. You then created a layer mask from your filter mask.
Now go back to the copy of the Layer you just created and click onto the Filter mask. Press CTRL I and you inverted the selection, now everything but the sky is selected, and as you can see the seetings of the shadow highlight filter form the sky were applied to the rest as well.
But you do not want that, and because we have it as smart filter now, we can just open that S/H Filter and enter new values.
Pheww...
I then continued to add layers to several independant areas as described above. Stuff such as denoise, filters, etc. It got pretty big at the end.
Hope that all makes sense to you, I am pretty hopeless explaining stuff.
John_Nevill
New member
Georg, this HDR stuff is infectious.
Autumn Wood - based on 5 bracketed exposures.

Canon 5D - Sigma 12-24mm @ 12mm - f/11.
Autumn Wood - based on 5 bracketed exposures.
Canon 5D - Sigma 12-24mm @ 12mm - f/11.