Jack, I can only admire the picture. More so because I do not know how to do panos. With the instrument
Asher and you have shown for panos and their cost, I will take a rain check.
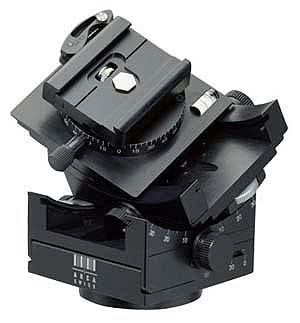
Btw Jack, this explanation nails it for me...this instrument is not for me..' It means the center of the tilt axis on the head is roughly co-linear with the center of the lens' optical axis when the camera is mounted on the head...'. Perfect.
Fahim,
Simply this is a device that allows one to swing the camera from side to side or tilt it forward to the ground or up to the sky and the camera lens will move much like the eye does in it's socket, smoothly. This allows one to take adjacent pictures of a large scene, just as we do when we glance left then right and add up the sense of it in our brains, with no second thought. Well as clutsy as it may seem, this mechanical set of stages does the same job for a big camera as if it was an eye in an eye socket. Here the camera can weigh 2-10lb so this is impressive.
Don't let this elegant block of engineering make you believe that there is some great difficulty im making panoramas. Simple keep the leading edge of your lens in about the same place as you rotate to the left or right a tad and take a second picture, overlapping the first.
How it's done with no extra equipment: Just select these in Photoshop under File, "Automate" and choose "Merge" and voila your two pictures will be matched and joined as one. The more pictures you add the more demands you put on your arms keeping the end of the lens in about the same spot. For most scenics, this does not have to be a meticulous set up as the software will do lots of little adjustments to make things fit. Essentially all you need to do is just cover your scene with a few overlapping pictures and they will form a panorama.
Only when you get more demanding and ambitious as with this panorama with closely similar colors, no rectangular framework of walls and doors with clear margins do sophisticated tools like the Arca Brick or even a simple tripod head become necessary. However, having this gear, allows the accurate rebuilding of the scene with almost zero distortions.
Back to your 2-4 picture overlapping handheld as best as you can stitch, it will be good enough to enlarge to 11"x14" with moth folks not having any idea that this was stitched. That's how good Photoshop and Autopanopro, for example are.
The precision instruments
only are needed when the picture is demanding such as a commercial job, this soft scene especially if a number of bracketed exposures are taken to cover the deep shadows to the brightest reflections in water and polished steel or the brightest shop windows on a dark street in the rain at night. This is not what most folk need to be concerned with.
I hope then that Jack's picture will inspire you to try some panos of scenes around you. As a start, try taking a picture indoors where your lens is not capable of capturing the entire room. Just take 2-3 overlapping pictures with the same settings and you are done! don't need a tripod or pano head. My picture of the Walt Disney Concert Hall was made totally handheld! That took about 40 shots I expect. For 2-3 overlapping pics you could do it right first time.
So forgive us for getting so interested in this odd block of machine, I'm just amazed by it and the effort that went into it. I don't like my enthusiasm for this elegant specialized tool to inhibit folk from experimenting with stitching adjacent parts of a scene. Remember, it's what our eyes already do all the time. So it's natural, simple and smart to use this
same idea with a modest camera. This is far more sane compared to chasing after ever larger and more expensive cameras and wider lens.
Once you stitch, you can carry less lenses!
Fahim, and anyone else who has not taken advantage of the magic of stitching, give it a try...
Asher
...... and yes, Doug, as he swings his camera isocentrically around the end of the lens, there will be some error but it really doesn't matter for distant objects.

")