
Asher Kelman
OPF Owner/Editor-in-Chief
I am perplexed by a finding that needs explaining. When trying to recover some evidence of the back of the head of a dancer in dim light, (panel A in the figure), below, I used the recover slider in Capture One and as expected, the back of the head, albeit grainy, was recovered, (shown in panel B.). Good I thought. I can work with that!
But that was transient. A blur took over in C below.
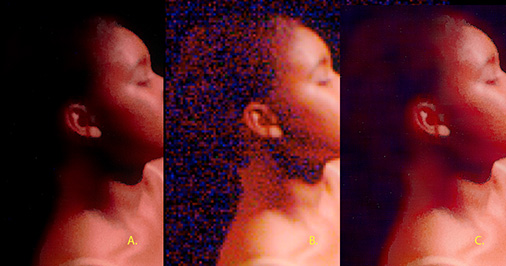
Asher Kelman: Dancer in Dim Light 5DII RAW Processed in Capture One 5.1
Canon Firmware 2.07, 70-200 2.8 L IS at f 2.8, 1/180 sec, ISO 3200
Cutouts Shown at 0.5 File Size
A. Default with contrast minimized B. 100% Shadow Recover: instant screen-grab C. 100% Shadow Recover: seconds later
As the Shadow slider was moved, the back of the dancer's head appeared. It had volume and is distinct from the formless background. No matter what I did, I couldn't retain any clear evidence of even that outline as the "opened up shadow" area was automatically processed a step further. That's so frustrating!
Now can anyone explain why Capture One has to add a blur to the low light recovery area? It seems like when it is getting poor data it hides it by blurring that portion! The rest of the image is no affected at all by the unwanted C1-added blurring artifact!
It seems that there might be a noise removal algorithm that C1 is using. Is there some setting to remove this?
Thanks for your interest and any ideas!
Asher
But that was transient. A blur took over in C below.
Asher Kelman: Dancer in Dim Light 5DII RAW Processed in Capture One 5.1
Canon Firmware 2.07, 70-200 2.8 L IS at f 2.8, 1/180 sec, ISO 3200
Cutouts Shown at 0.5 File Size
A. Default with contrast minimized B. 100% Shadow Recover: instant screen-grab C. 100% Shadow Recover: seconds later
As the Shadow slider was moved, the back of the dancer's head appeared. It had volume and is distinct from the formless background. No matter what I did, I couldn't retain any clear evidence of even that outline as the "opened up shadow" area was automatically processed a step further. That's so frustrating!
Now can anyone explain why Capture One has to add a blur to the low light recovery area? It seems like when it is getting poor data it hides it by blurring that portion! The rest of the image is no affected at all by the unwanted C1-added blurring artifact!
It seems that there might be a noise removal algorithm that C1 is using. Is there some setting to remove this?
Thanks for your interest and any ideas!
Asher