• Please use real names.

    Greetings to all who have registered to OPF and those guests taking a look around. Please use real names. Registrations with fictitious names will not be processed. REAL NAMES ONLY will be processed

    Firstname Lastname

    Register

    We are a courteous and supportive community. No need to hide behind an alia. If you have a genuine need for privacy/secrecy then let me know!
  • Welcome to the new site. Here's a thread about the update where you can post your feedback, ask questions or spot those nasty bugs!

TIPS & TRICKS No. 5 - Correcting Focus Errors

Tim Armes

New member
This thread is part of the Tips & Tricks problematics. See here for more information.

Hi all,

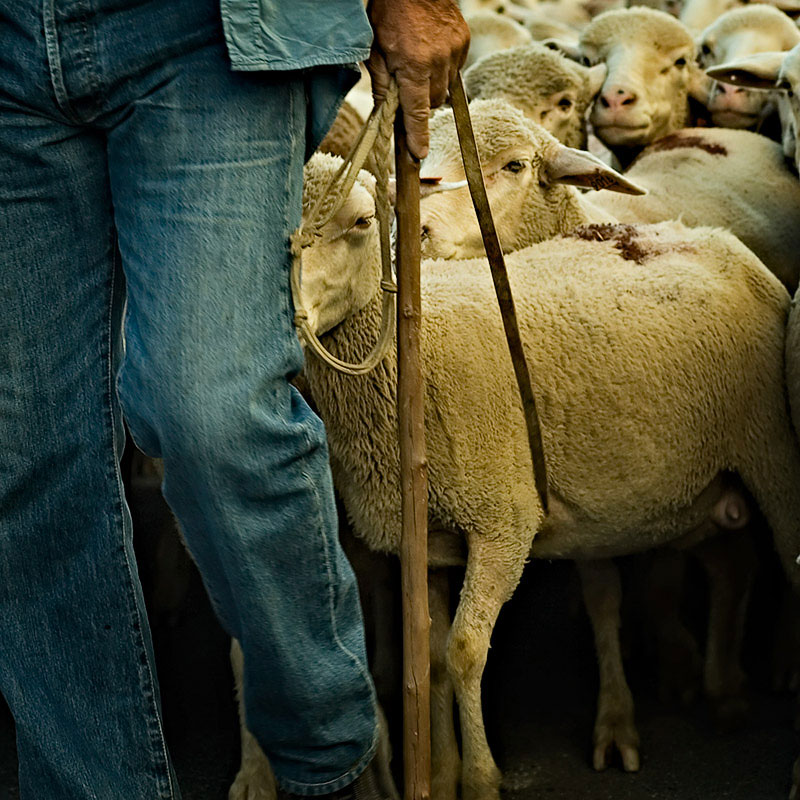
I personal one this time. The image in question was discussed elsewhere on the forum, and it suffers from a slight mis-focus.

So, the purpose of this "tips & tricks" is to suggest ways in which we can try to improve the result. I would normally just delete any photo with this sort of problem, but just occasionally the photo is of importance. In this case, it nicely sets the scene for a photo reportage.

I've performed the RAW conversion and made the resulting TIFF available. Notice that the colour space is ProPhoto, so you'll definitely need need a colour managed application to handle it.

Tim
 
Last edited:

nicolas claris

OPF Co-founder/Administrator
Bonjour Tim

my try downsized to 800 pix:

WithMyMaster_NC.jpg


My sharpening action at 100% + a noise ninja @50% and sharpen again after downsizing : 80/0.6/0

But sharp image starts with raw, I'd like to start from there instead of a tif...

anyway, as you've already started, the focus is not on the right place, so no miracle possible!
 

Ray West

New member
Hi Tim,

I think 'sharp' is a relative term, or it can be. I think you want to move the sharp area (point of the viewer's eye focus). I aimed to get it in the loop/stick/hand area. I selected this area - lasso? - copied selection to a new layer, then sharpened it too much, but used the layer opacity slider to adjust its effect. I then selected the inverse, new layer, blurred that, then a couple more areas for blurring the sheep. I hope my image shows the idea. A bit more care in selecting the areas would be good. However, I am crap at getting things from my screen to the web - maybe that's the subject of your next hint.....

I think, depending on the purpose/size of the final prints, you could get away with it.

WithMyMaster.jpg


Best wishes,

Ray
 

Ray West

New member
ot - re Nicolas's sharpening action

Hi Nicolas,

I tried using your excellent sharpening action, but had problems with this image. iirc it was not finding some functions, I think I was trying to use it on selections/layers. (Any chance of a revision - please)

Best wishes,

Ray
 

Tim Armes

New member
Bonjour Tim

my try downsized to 800 pix:

Hi Nicolas,

You've inadvertently bought up an interesting point that's well worth expanding on. I'm sure that most people here already know that the depth of field in a photo is determined by the eye's ability to resolve detail. Only one plane from the subject is truly in focus, either side of this plane the points will be rendered as small discs. The discs get bigger as the object being imaged gets further away from the point of focus.

Now whilst those discs remain small, we see them as points and so they appear to be in focus. This gives us the Depth of Field.

I mention this because there are several things that effect DOF, and many photographers forget some of them. The obvious ones are those relating to the choice of aperture and the length of the lens. However, it's important to realise that the size of the print and the distance of the viewer from the print also play a role.

If the image is printed smaller, so are those tiny discs, and so they become points, and so the DOF is increased. Similarly, moving away from the print does the same thing.

All this to say that yes, reducing the size of the image will increase the Depth of Field.

Tim
 
Hi Nicolas,

I tried using your excellent sharpening action, but had problems with this image. iirc it was not finding some functions, I think I was trying to use it on selections/layers. (Any chance of a revision - please)

It's simple to do the revision and make the action even more versatile.
Just replace the first "Duplicate Background" by "Duplicate current layer" (Layer menu, "Duplicate layer ..." , and then naming that layer to "Sharpened layer").

To even further enhance its versatility, toggle the 'Dialog on' box in front of the two last Smart sharpen activities. One can use an amount of 1 to effectively skip the final sharpening and only use the preceding tone adjustments. One can also replace the last sharpening commands with something else, even another (sharpening) action.

Bart
 

Ray West

New member
Thanks Bart - I hadn't pulled apart Nicolas's action, since it worked fine out of the box, in most cases I'd used it on. Your pointers should save me some time.

Best wishes,

Ray
 

Tim Armes

New member
Unfortunately I'm currently on a business trip and I don't have access to my catalogue. Nevertheless, i thought that I'd follow up a little.

I downloaded a trial copy of Focus Magic to see if that would be able to improve the image. Focus magic requires you to specify the amount of correction being applied, and after playing around I realised the different parts of the image require different values.

To get the best result, I corrected the image 3 times, each with a different setting, and then blended the results with the original in Photoshop.

The result is a definite improvement. It doesn't look tack sharp, but I think it may now make an very acceptable A4 print. I'll be trying that once I get back.

The truth of the matter is that unfocused images are impossible to truly rescue in post-processing. However between Focus Magic and some localised sharpening, it is possible to get an acceptable result. Don't expect it to hold up to close scrutinisation however.

Tim
 

Tim Armes

New member
Update: Where there's a will there's a way. I now have a version of the photo with a pin sharp sheep head (although you can't tell in this small version).

withman.jpg


This is a good solution when a photos really needs saving. Here, I've swapped out the head for another one that was in sharp focus. The final effect is perfect.

Tim
 

Tim Armes

New member
Great, Tim! So tell us, how did you do it?

Cheers,

Well, I'd deleted loads of photos from the shoot, so the first step was to use a file recovery program on the compact flash. Then I looked for a head that both in focus and pointing the right direction.

I pasted the sharp photo on top of the old one and reduced the opacity so that I could see both. This allowed me to scale and move the sharp photo so that the head was overlayed perfectly on the old one.

Then I created a layer mask for the sharp photo and filled it with black (so that you couldn't see it). I put the opacity back up to 100% and then brushed back in the sharp up by painting with white in the layer mask.

Tim
 

Cem_Usakligil

Well-known member
Well, I'd deleted loads of photos from the shoot, so the first step was to use a file recovery program on the compact flash. Then I looked for a head that both in focus and pointing the right direction.

I pasted the sharp photo on top of the old one and reduced the opacity so that I could see both. This allowed me to scale and move the sharp photo so that the head was overlayed perfectly on the old one.

Then I created a layer mask for the sharp photo and filled it with black (so that you couldn't see it). I put the opacity back up to 100% and then brushed back in the sharp up by painting with white in the layer mask.

Tim

Ah, nothing autoMagical then <smile>. Just the good old compositing using layer masks. Well, it's a good thing we have those recovery programs after all, don't we ;-).

Cheers,
 

Scott B. Hughes

New member
My sharpening action at 100% + a noise ninja @50% and sharpen again after downsizing : 80/0.6/0

Aloha Nicolas. I must have missed earlier discussion regarding your sharpening action.

Am I understanding correctly that you created a PS action for sharpening needs? Could you point out where it is detailed? Thank you.

-Scott
 

Scott B. Hughes

New member
Thank you Nicolas... I've got a few images from last night's efvent where the 1Ds focused where I didn't expect!

A quick trial shows some hope. -Scott
 

Asher Kelman

OPF Owner/Editor-in-Chief
Hi Chip,

The DOFPRO software is interesting especially for movie makers. However, for photoshop users, we need to get a depth map which we have to create by hand. So why not just do what I already do, a series of blurring excluding the plane of maximum focus and giving most blur to the most distant areas?

What's so special about this plugin that we can't do fast by hand?

Asher

Anyway, this plugin does not focus defocussed areas, AFAIK, just blurs in zones, it seems.
 

Chip Springer

New member
Hi Chip,

The DOFPRO software is interesting especially for movie makers. However, for photoshop users, we need to get a depth map which we have to create by hand. So why not just do what I already do, a series of blurring excluding the plane of maximum focus and giving most blur to the most distant areas?

What's so special about this plugin that we can't do fast by hand?

Asher

Anyway, this plugin does not focus defocussed areas, AFAIK, just blurs in zones, it seems.

I thought some might find it interesting. It definitely isn't the fastest way to go...and like I said, you can do the same with Lens Blur's Depth Map (the plugin has more options).

Another trick besides extracting and pasting is to blur the surrounding area. Sometimes this tricks the eye into seeing the subject in focus.
 

Asher Kelman

OPF Owner/Editor-in-Chief
Chip,

I should have thanked you for introducing me to the plugin. If I was doing movies, I'd think of this software since it can key and track changes over a large number of frames.

Asher
 
Top