• Please use real names.

    Greetings to all who have registered to OPF and those guests taking a look around. Please use real names. Registrations with fictitious names will not be processed. REAL NAMES ONLY will be processed

    Firstname Lastname

    Register

    We are a courteous and supportive community. No need to hide behind an alia. If you have a genuine need for privacy/secrecy then let me know!
  • Welcome to the new site. Here's a thread about the update where you can post your feedback, ask questions or spot those nasty bugs!

Exposure Target - C1

Ben Rubinstein

pro member
Hi,

Is there any way to use an exposure target in C1?

I'm photographing manuscripts and books using a copy set up. Some books fluoresce more than others due to bright pages, some are nearer to the light because they are thicker.

Is there any way to say photograph a chart with each job then click something on a grey square and adjust the exposure until a readout of values on the square is accurate? I could then do that with every job to make sure that I have exactly the same baseline.

You can do this with the levels tool if you have a black and white square. Technically. In reality the white square is never white enough neither the black dark enough for accuracy.

I'd like something where I would establish a benchmark so that even if the lights move slightly or I had a slightly wrong setting or indeed one lens has a different t-stop than another so that the f16 of one is different to the f16 of another, I could use this benchmark to always be able to equalise the exposure to accurate. I need accuracy more than my eyeball can provide.

This is especially important as shooting an LCC seems to change the exposure drastically and differently each time. I need to be able to get back to accurate using a benchmark.

Any suggestions?
 
Hi,

Is there any way to use an exposure target in C1?

I'm photographing manuscripts and books using a copy set up. Some books fluoresce more than others due to bright pages, some are nearer to the light because they are thicker.

Is there any way to say photograph a chart with each job then click something on a grey square and adjust the exposure until a readout of values on the square is accurate? I could then do that with every job to make sure that I have exactly the same baseline.

Hi Ben,

This really requires several steps to calibrate your workflow.

1. Make sure that your lighting setup produces an even lighting over the full surface where your manuscripts or books will be positioned. When you then take an LCC image through a piece of diffuse plexiglass or opal glass at the intended aperture setting, you'll be able to make sure that the lighting setup will produce a well balanced result everywhere and vignetting will also be compensated for (it can even deal with sensor dust issues).

2. You'll need to calibrate the exposure level, e.g. by using a Whibal chart which can also be used to Whitebalance for the color of your lighting setup. All you need to do is determine how much you need to correct your exposure meter reading of the Whibal, to not clip the brightest paper you are likely to encounter. You can use Capture One to shoot tethered, and when you use the linear tone curve setting you'll be able to figure this out in a few shots. Just shoot a piece of white paper with the Whibal placed on it, spot meter the Whibal, and take an exposure.

The spotmeter will reduce the brightness of the Whibal to medium gray, so you'll want to add an exposure compensation of, say, +1.33 to +1.66 EV. You can use the exposure slider in Capture One to figure out how much more or less exposure compensation you can give. You would normally aim for a paperwhite RGB readout of something like 235 to 245, but if there are no specular reflections to be expected, you can even go a bit higher (check the C1 histogram to avoid highlight clipping which might influence the whitebalance). You only need to figure this out once and you can always use the same +EV compensation.

You now know how to use a Whibal card as a reference to measure optimal exposure for white paper, and determine an accurate color balance at the same time. You can use the Whibal also when the book is thicker and thus closer to the lights, just put it on top of the book page, and spot-meter it for a manual exposure and the +EV correction that you figured out that will bring paper white to the correct level.

Cheers,
Bart
 

Ben Rubinstein

pro member
Hi,

Thanks for that Bart, not really looking for before shooting technique, 1/3 of a stop isn't accurate enough, I'd like to get it down to a minimum of a 1/10 of a stop. That takes post production techniques, specifically a way in C1 to be able to click on an area, view an RGB readout then using the exposure tool, change it till it reaches my benchmark. I can do that in ACR but don't seem to work out how to do it in C1?

Example of what I'm talking about, did the measurements today, a book of 6cm depth. As the book recedes from the lights (as you get from the fat part to the end of the book) the exposure changes slightly under 1/10 of a stop per cm. Now I can adjust 1/10 with my profoto D1 but I need even better than that otherwise there is a loss of consistency throughout the book which when required to shoot for 100% accuracy of a hundreds of years old artifact, is essential.
 

Asher Kelman

OPF Owner/Editor-in-Chief
Hi,

Thanks for that Bart, not really looking for before shooting technique, 1/3 of a stop isn't accurate enough, I'd like to get it down to a minimum of a 1/10 of a stop. That takes post production techniques, specifically a way in C1 to be able to click on an area, view an RGB readout then using the exposure tool, change it till it reaches my benchmark. I can do that in ACR but don't seem to work out how to do it in C1?

Example of what I'm talking about, did the measurements today, a book of 6cm depth. As the book recedes from the lights (as you get from the fat part to the end of the book) the exposure changes slightly under 1/10 of a stop per cm. Now I can adjust 1/10 with my profoto D1 but I need even better than that otherwise there is a loss of consistency throughout the book which when required to shoot for 100% accuracy of a hundreds of years old artifact, is essential.


Ben,

Congrats on the job! I too like the idea of a challenge.

The issue with fall off is due to using an overhead light too close to the book. If one increases the distance then the fall off will be minimized. So a 2 cm curve in a page or drop from one side to another of an open book is more evenly lit by pulling the lights say from say 1 meter away to 2.5 meters away, if that's possible. Also, as one moves away the light, it should get larger to make the illumination even. A simple approach is to use a 4 sets of long fluorescent balanced daylight tubes on a plywood frame.

Or else the inexpensive daylight bulbs recommended in Imatest™ . Here you can use multiple very inexpensive daylight bulbs on boards at 45 degrees. Incandescent light bulbs are something like 25 watts and obtainable from a hardware store like Home Depot or.... else one can use fluorescent lights, (F32T8/CM65 lamps CRI of 94+)

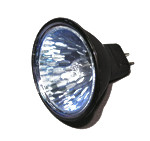
Solex is a good light source. You can mount 10 simple sockets with the ballast on a board for these ~ $17 low voltage lights:

SoLux-Black-Back-Web.jpg

or if you can afford it, 2 of these, at $695 each

10lightarrayweb.jpg

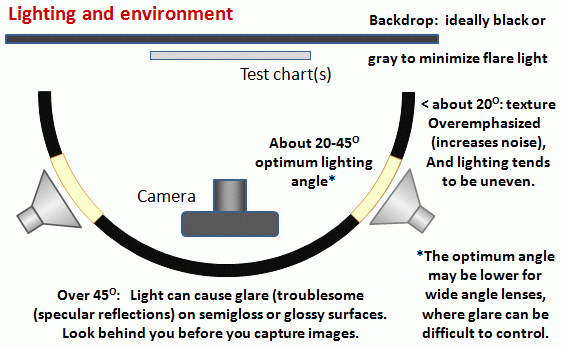
and they should be set up like this:

Lighting_environment.gif


Then one checks for uniformity with an exposure spotmeter and color temp. Follow Bart's suggestions in using the gray card.

I hope this is of some help.

Asher
 

Ben Rubinstein

pro member
Yup, that's how you would light it regularly.

The lighting positioning or angles cannot be changed. Sorry. Otherwise a large softbox would solve the problem pretty much immediately. I'm using a single polarised unsoftened light very close to the page. This gives a very hard and very sharp result. It is of course uneven but using the LCC corrections in C1 I get an even result but without sacrificing the sharpness advantage of the use of a single directional light.

Shooting at iso 80, polarised light and lens at f16 doesn't really make for much use of ambient light! I've got a Profoto D1 about 15 inches from the page at 90% power just to give me enough light. The shooting table came with LED strips but I get 0.8 seconds and when you're fighting to keep pages open, that's too long to work fast with.
 

Asher Kelman

OPF Owner/Editor-in-Chief
Ben,

Great to have a Profoto D4. Makes for reliable workflow. Can you give us a picture of the setup. Is there just one light? I'm wondering where the camera is with just 15". I expect you have 2 lights at 45 degrees, but perhaps not.

Asher
 

Ben Rubinstein

pro member
One light at 45 degrees about 15 inches from the page. The camera is on a moving cradle which using lasers is kept at a precise focus point however near or far the page gets from the sensor due to progressing through the book. A 14,500 euro solution before you get to the lights or the MFDB! Luckily I didn't have to pay for it, I just get to make it work...
 

Jerome Marot

Well-known member
Is there any way to say photograph a chart with each job then click something on a grey square and adjust the exposure until a readout of values on the square is accurate? I could then do that with every job to make sure that I have exactly the same baseline.

I never used capture 1, so I have no idea whether it is scriptable, but what you describe can be automated in photoshop:

-you need the grey target to be at the same place on each picture
-you select a target crop
-you let auto WB and auto exposure run on that crop
-you deselect

But I don't understand why you would do that: your light is fixed, you only need to measure WB once. Same goes for exposure: the differences you note come from the books (which have more or less fluorescence) and the target will not measure that. In other words: since your light and your target never changes, you will always get the same measurement. You said your light is not 100% stable (power, distance) but I suppose it stays stable when it is set up, doesn't it? You only need a reference at the beginning of each session.

You are not quite clear with the setup, so maybe you meant that the differences mainly come from the thickness of the book (but why would color temperature be any different then?). If this is the only problem, what about photographing the target on different reference thickness blocks and correct using precomputed these values? I suppose that your program has a way to copy settings from one image to another.
 

Ben Rubinstein

pro member
The problem is not WB, it is only exposure and as you mention in you last paragraph, the difference is book thickness. I was told on another forum that you can set 'flags' in C1 which do exactly what I need, show the readouts. A perfect solution!
 

Asher Kelman

OPF Owner/Editor-in-Chief
One light at 45 degrees about 15 inches from the page.

That use of one light puzzles me unless you have some sort of graduated filter to normalized the light reaching the book.

The camera is on a moving cradle which using lasers is kept at a precise focus point however near or far the page gets from the sensor due to progressing through the book. A 14,500 euro solution before you get to the lights or the MFDB! Luckily I didn't have to pay for it, I just get to make it work...

Could you share more on this intriguing device. Who normally uses such elegant solutions? I'd love to see some links.

Asher
 

Ben Rubinstein

pro member
You ever used an LCC target in C1 Asher? would answer all your questions. You shoot a white frame through a piece of opaque white plastic held infront of the lens, this gives you a precise map of the light/shadow transistions, C1 then takes the file and builds a profile to negate problems such as lens colour cast, dust spots on the sensor but in our case, evens out the exposure across the frame to give fully even lighting. This profile can then be applied to all the necessary pictures. It's not 100% but it's a good 90% accurate and pretty much good enough for my needs.

The unit is a custom version of the Mayer Traveller, built by Manfred Mayer of the Graz University in Graz, Austria. He doesn't have a website, (other than this: http://www.vestigia.at/der_traveller.html showing a very basic version of the Traveller) this stuff is custom made to order from the top universities and museums worldwide and it's pretty much a case of if you're in the business you know about it and how to order one. I was recommended to him by Stefan Steib, the maker of the HCam and owner of Hartblei (the real one, not the eastern German knockoff) and head adviser for the digitalisation department as the Bavarian University of Munich. Both of them are exceptionally nice people and incredible engineers.
 
Top