• Please use real names.

    Greetings to all who have registered to OPF and those guests taking a look around. Please use real names. Registrations with fictitious names will not be processed. REAL NAMES ONLY will be processed

    Firstname Lastname

    Register

    We are a courteous and supportive community. No need to hide behind an alia. If you have a genuine need for privacy/secrecy then let me know!
  • Welcome to the new site. Here's a thread about the update where you can post your feedback, ask questions or spot those nasty bugs!

Why HDR or exposure bracket at all?

Hi folks,

On another forum I posted a small example that attempts to answer that question, but to avoid sending you to another website, I'll repeat the relevant info here.

In many forums about photography, there seem to be a few misconceptions about what HDR photography is (or should be) about.

First of all, a scene as captured will often have a range of luminosities that will be compressed for viewing on your display or on print, even if you do nothing special to it. The problem is that as the scene contrast gets higher, the rendering of all tones from dark to light in a limited dynamic range output modality such as a 200:1 display, or even worse a 100:1 (glossy) print, wil result in a very low contrast dull looking output. So some sort of tonemapping is usually required anyway.

Second, when tonemapping the image, some significant local tonal adjustments may (have to) be applied. This typically results in poor shadow quality, assuming the initial exposure was correctly exposed to only just avoid clipping of the highlights. The goal of exposure bracketing is first to achieve the best possible exposure for the highlights (maximum exposure while avoiding unwelcome clipping), and second to increase the quality of those shadows (improve signal to noise ratio).

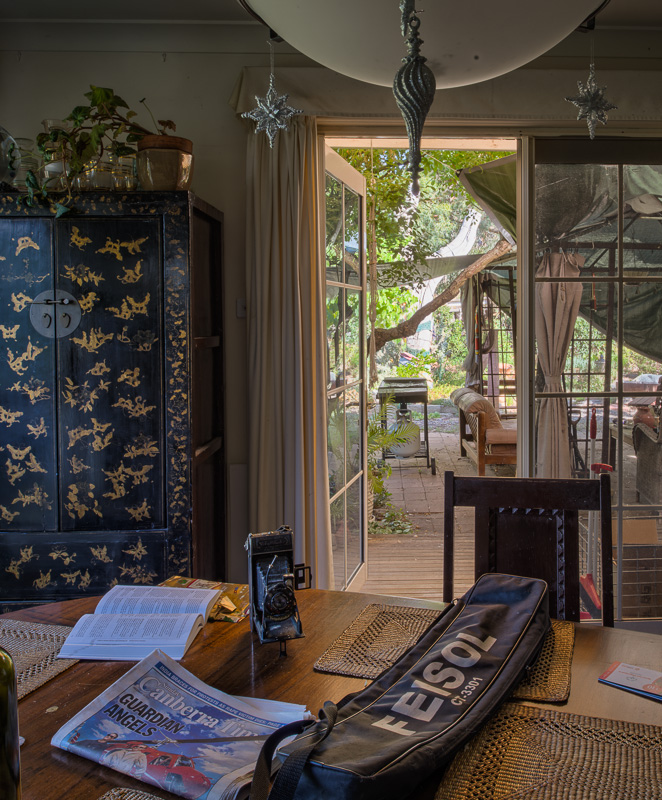
Let me illustrate the situation with a few image fragments. The image has no particular artistic merit, it was a demonstration file shot for a client.

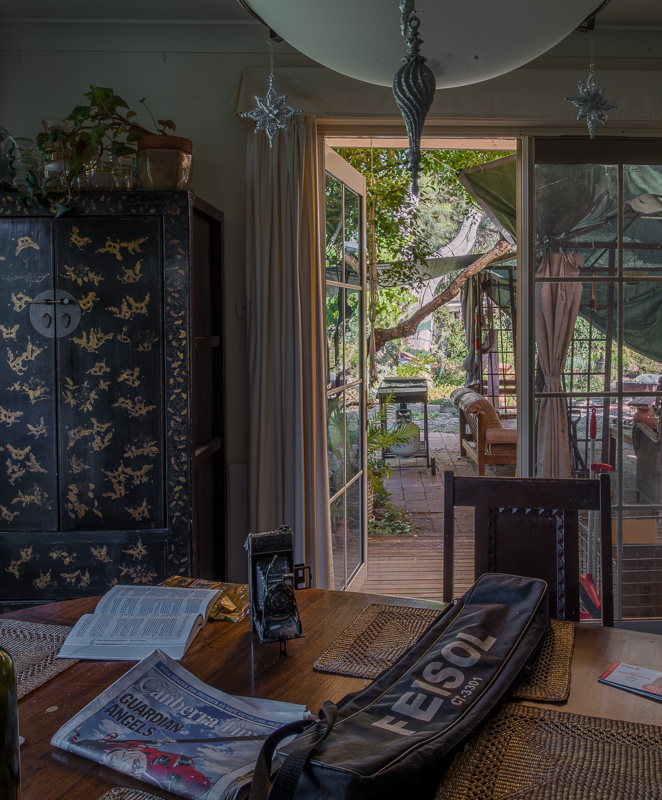
Here are 2 different bracketed exposures of the same subject. The first was a little less than 1/3rd of a stop below clipping of the Raw data. The bracket (not shown here) with 1/3rd of a stop more exposure had clipped green channels in the sky area, so might have survived highlight recovery, but I was aiming for a perfect unclipped ETTR exposure. The second exposure was 10.67x as long (= +3.42 EV), which is not a problem with stationary subjects, and obviously has significant (unrecoverable) clipping of highlight detail, but also much better shadow detail.

6301_CO701_sRGB.jpg
6299_CO701_sRGB.jpg

Continued in the subsequent post due to a limitation on the number of images per post ...
 
Continued from the previous post.

Here are three crops of the relevant shadow area, at 100% zoom, no noise reduction, no sharpening. First one is the correct ETTR highlight exposure version, the second is that same exposure boosted in Raw conversion, and the third is from the longer exposure time version. Mind you, there was no tonemapping applied other than a gamma conversion from linear Raw to sRGB. Additional tonemapping would have exaggerated the shadow issues even more.

6301_CO701_sRGB_1.jpg


6301_CO701_sRGB_2.jpg


6299_CO701_sRGB_1.jpg

When these two images are combined in a single file (I would normally use a few more intermediate exposures), it becomes possible to significantly tonemap the local contrast of the images for a more realistic look (as we saw it in real life) without compromising the shadow and highlight detail quality. And this is just one of many possible tonemapping renderings.

6299+6301_CO701_sRGB-HDR(2).jpg

And this scene was shot under an overcast sky, imagine what the challenges would have been under direct sunlight ...

The goal of HDR and exposure bracketing is to provide a more robust set of image data for further postprocessing. It obviously benefits larger format output more than reduced size web images where a lot of small detail is downsampled away.

Hope that this helped to explain the issues a bit.

Cheers,
Bart
 

Asher Kelman

OPF Owner/Editor-in-Chief
Thanks, Bart for sharing your wonderful essay. It's really helpful even to an experienced photographer. It's good to move away from the supposed "HDR effect", where things have metallic hues and hard edges are created as if a line drawing is superimposed. The true rich nature of human vision is made up by the brain interpreting areas and even perhaps altering through perception areas with local adaption or contrast changes so that the brain might be allocating it's range of tonal sensibility divisions into different zones for shadow and highlight regions of a scene. The fact remains that we can see better then a lot of the snaps we take. We not only see things, we "re-see' them if important, concentrating our attention to different parts or aspects of the image, all the time, referencing libraries of primitive shapes and stored accurate images in values and significance on everything there. Cameras don't have this deeply capable perceptual computer behind it!

HDR, done well, as Bart as shown, allows us to put tones in such places on a brightness scale so that a display can show them and a printer can print them for us to appreciate the scene as well as or better then seen with the naked eye.

Let me add, for any Newbies, "ETTR", means "exposure to the Right" in the histogram seen on the digital camera's LCD display. There's religion that in a single exposure, ETTR is best. However that's arguable for most situations. For arguments on this subject, read this contentious blog!

Asher
 
Yes Bart, sadly, many people today think of cartoony, overcooked, over saturated, images as "HDR".

It has almost gotten to a point that it is not worth the time explaining what the intended purpose of bracketing is.

I wish I had a dollar for every time I reminded someone that HDR is not a style but a tool for creating images with higher dynamic range than the sensor/film can capture in a single exposure.
 
Yes Bart, sadly, many people today think of cartoony, overcooked, over saturated, images as "HDR".

Hi Jake,

Indeed, and that also creates confusion for those who could really benefit from using the additional data quality. Once they hear HDR being mentioned as a tool or solution for a difficult lighting situation, they sometimes reject that off-the-cuff because of the bad reputation that the over-the-top processing caused. I don't deny those people their fun, think about all those smartphone apps that people use, but then tastes differ.

It has almost gotten to a point that it is not worth the time explaining what the intended purpose of bracketing is.

That's part of the reason that I posted this. It's now easier to post a link than to explain this over and over again.

I wish I had a dollar for every time I reminded someone that HDR is not a style but a tool for creating images with higher dynamic range than the sensor/film can capture in a single exposure.

Wouldn't that be nice ...

Cheers,
Bart
 

Michael Nagel

Well-known member
Maybe the 'feel' of the too frequent abuse of tonemapping has created led to the distinction between HDR and DRI with DRI being the variant that focuses on the increase of dynamic range (as the acronym Dynamic Range Increase suggests) without the extreme effect used for so many HDR pictures. At least for me...

With newer sensors like the Sony Sensor used in the Nikon D7000, Pentax K-5 and Sony A77 the need for multiple exposures has decreased a little as preserving highlights and pulling up the shadows can be done for up to 4 f-stops in RAW depending on quality needs and personal taste.

Best regards,
Michael
 
I recently purchased a Nikon D800 which has the greatest dynamic range of any DSLR at the moment. I was wondering whether I would be able to forgo HDR/DRI so I tried a test:

dsc0175-hdr91.jpg

This is looking out the back door late yesterday afternoon. The room is in deep shadow but the bleached dead tree in the background is in bright sunlight. This combines nine images taken one stop apart. It's just a test with no artistic aspirations. I think it could have done with another dark exposure to hold down the highlights a touch more gracefully and possibly another bright exposure to bring out more detail in the camera (though it's not actually underexposed). Clearly no single exposure could capture the range.

So even with nine exposures the D800 was stretching to cover this exposure range. I will be carefully considering where I only need a single exposure but some of the time I will still need to bracket.
 

Asher Kelman

OPF Owner/Editor-in-Chief
So Murray,

What would you do if there was a person sitting in the room? Would you take a picture of her properly exposed and then cut out the b.g. to fuse her with this scene from 9 shots?

I believe that Autopano Giga now allows one to identify people you want to keep, so it might work.

Asher
 
Well it wouldn't work with this lighting because the far background is too bright and you can see from the shadow of the camera that the main lighting is coming from out there. So I'd wait a few hours for the light to go down to equalise the background more and probably add a little supplementary lighting inside. Then seat her in front of the doorway say with her hand on the camera and the book in front of her and other objects cleared. That still might require an HDR approach.

But your question is how to cope with the possibility of her moving. Well, SNS can cope with this up to a point. It takes the brightest exposure in the series which could work OK here because she would be relatively in the shadows. Merging in Photoshop could work if it happens to be a combination of images Photoshop can work with since you can select the preferred exposure but you would not get the finesse of SNS. If I needed to be accurate I might take a full HDR without her, carefully add her without moving anything, take another exposure and manually merge. Another possibility is that she might stay still enough so it wouldn't matter.

I've found Autopano Pro a bit hit and miss. It does some things well that I can't do other ways and other things not so well. I haven't upgraded yet though I probably will go to Autopano Giga and I'm not yet familiar with any new capabilities.
 

Michael Nagel

Well-known member
Murray,

thanks for showing. Actually this rises one more question:

Your description suggests an approx. 23 EV dynamic range of the picture captured with bracketing. Was the histogram exposed to the right on the highest exposure and was it full to the left on the lowest exposure?

The 14 EV of dynamic range you get with current sensors (D800 14.4 EV, K-5 14.1 EV, other cameras with the same sensor not that much different, for me there is no practical relevance in the numerical difference between these sensors mentioned) covers quite a lot of situations and the 3 to 4 additional EV of dynamic range compared to older sensors helps a lot to cover more situations than before.

I do not know how future sensors will perform in this aspect. Maybe this will increase a bit again.

Best regards,
Michael
 
Your description suggests an approx. 23 EV dynamic range of the picture captured with bracketing. Was the histogram exposed to the right on the highest exposure and was it full to the left on the lowest exposure?
In a word, yes. I was interested to investigate this tonal range. The light inside was in the shadow and there are several black objects (the cabinet, the camera, the tripod case) while the chair and the partial wine bottle (bottom left) are quite dark. Conversely, it was a cloudless day outside with very bright Australian summer sun, even though only 90 minutes before sunset.

The camera histogram is based on the sRGB jpg preview and is therefore not entirely accurate. Similarly, you can pull back images in Lightroom that look hopelessly blown. I more accurately determined exposure using RawDigger, currently free in Beta until a date in February. This shows that my darkest exposure was 0% over exposed on all channels while the second darkest exposure was 0.1% overexposed in the green channels. I take that to mean 0.1% of the pixels in the image were overexposed but they were all on the tree and may therefore have been significant. In the lightest exposure, 0.7% of the red and blue channels were underexposed but they were at the underside of the tripod bag and the lower part of the bottle (mainly cropped out) and not important to the image. In the second lightest exposure, 3.5% of the red and blue channels and 0.9% of the green channels were underexposed and this included the front of the camera where retention of detail is desirable. Therefore the tonal range of the image was between 22.5 and 23.4 EV, or more if you wanted to capture all shadow detail.

Although I had theoretically captured sufficient detail, I wasn't entirely happy with the highlight interpretation I managed to extract in the image above. I just remembered there's another way of doing it. From Lightroom (4.1 and above, I think) you select Edit In.../ Merge to HDR Pro in Photoshop ..., generate and save a 32-bit file and then you can operate on it in Lightroom. (Asher, this is also another answer, because you can select a frame to freeze motion here).

dsc0167-edit.jpg

This works a bit better I think for the highlight areas. It showed up with a strong blue caste particularly in the open book on the table. Changing the colour balance didn't help; I simply desaturated blue.

Incidentally, the RAW files range between 36MB and 45MB; the SNS TIFF is 210MB and the Photoshop TIFF is 420MB.
 

Michael Nagel

Well-known member
Murray,

Thanks for the precisions. This is a tonal range I rarely encounter and there is one thing I am always concerned about when bracketing - moving objects. This is why I would like to see sensors with more dynamic range - then you get all in one shot.

Best regards,
Michael
 

Asher Kelman

OPF Owner/Editor-in-Chief
Although I had theoretically captured sufficient detail, I wasn't entirely happy with the highlight interpretation I managed to extract in the image above. I just remembered there's another way of doing it. From Lightroom (4.1 and above, I think) you select Edit In.../ Merge to HDR Pro in Photoshop ..., generate and save a 32-bit file and then you can operate on it in Lightroom. (Asher, this is also another answer, because you can select a frame to freeze motion here).

Thanks for further thought on my question of adding a perfectly exposed person to a carefully made HDR set of that room without the subject there. I don't follow "and then you can operate on it in Lightroom. I just work in capture One of CS5 Photoshop. What does Lightroom do here that is not part of Photoshop? Also explain, "because you can select a frame to freeze motion here".

I really appreciate your experience and ideas here since I do make a huge effort planning images that happen to be in high dynamic range locations and then need to add the people.

Asher
 

Asher Kelman

OPF Owner/Editor-in-Chief
Marray and Bart,

I wonder where the math is in arriving at 9 brackets? Can't one just measure the brightest area and the darkest and then from that compute how many steps are needed for a particular camera, about 1 extra for each additional step in DR needed to cover the scene? Do you have a formula or is this just "gestalt"? Surely, all we need to do is to have enough photons in the sensels to compute a number accurately from the voltage in the darkest channels but not so that those receiving more light approach getting filled and even spill.

I found a very nice discussion in Luminous-Landscape with a worthy explanation by you, Bart here.

Asher
 
Thanks for further thought on my question of adding a perfectly exposed person to a carefully made HDR set of that room without the subject there. I don't follow "and then you can operate on it in Lightroom. I just work in capture One of CS5 Photoshop. What does Lightroom do here that is not part of Photoshop? Also explain, "because you can select a frame to freeze motion here".
When you get into the Photoshop Merge to HDR Pro interface in this case, there are three things you do:
1. Make sure the Mode is set to 32-bit.
2. Drag the slider to get the image looking roughly plausible
3. There is a checkbox [Remove Ghosts]. If you check that you can click on each of the constituent images to see what works best to remove motion artifacts.

Then you click [Save] (to save from the HDR Pro dialogue box and return the image to Photoshop).

As a 32-bit image, there is only a limited amount of things you can do with it in Photoshop. No curves, for example. So close the image and save it.

It then opens as a TIFF in Lightroom. All Lightroom operations are now available in 32-bit mode giving you considerably more power than with a 16-bit image. You can easily optimise the image from the preliminary condition it arrives in out of Photoshop.
 

Asher Kelman

OPF Owner/Editor-in-Chief
When you get into the Photoshop Merge to HDR Pro interface in this case, there are three things you do:
1. Make sure the Mode is set to 32-bit.
2. Drag the slider to get the image looking roughly plausible
3. There is a checkbox [Remove Ghosts]. If you check that you can click on each of the constituent images to see what works best to remove motion artifacts.

Then you click [Save] (to save from the HDR Pro dialogue box and return the image to Photoshop).

As a 32-bit image, there is only a limited amount of things you can do with it in Photoshop. No curves, for example. So close the image and save it.

It then opens as a TIFF in Lightroom. All Lightroom operations are now available in 32-bit mode giving you considerably more power than with a 16-bit image. You can easily optimise the image from the preliminary condition it arrives in out of Photoshop.

A great tip on 32 BIT! I'll have to look into getting an update to my Lightroom! You're an endless source of help!

I wonder whether or not Nik filters work in 32 BIT? Should even work in 64 BIT, but I've not tried.

Thanks Murray!

Asher
 
I wonder where the math is in arriving at 9 brackets? Can't one just measure the brightest area and the darkest and then from that compute how many steps are needed for a particular camera, about 1 extra for each additional step in DR needed to cover the scene? Do you have a formula or is this just "gestalt"? Surely, all we need to do is to have enough photons in the sensels to compute a number accurately from the voltage in the darkest channels but not so that those receiving more light approach getting filled and even spill.

I found a very nice discussion in Luminous-Landscape with a worthy explanation by you, Bart here.
I was just doing a test here, so I found an extremely contrasty scene and used the greatest non-manual bracketing capability I had, which was 9 exposures at 1 stop intervals. I was also on +1EV to take account of the camera's underestimation in automatic exposure of ETTR. It was just a coincidence that the exposure range was pretty much covered by a 9-stop bracket.

You could measure the tonal range. I've read that a reading for the Zone 8 white with detail should be three stops above your exposure (in this blog which has an over-abundance of related technical information). Then you would determine where you want detail in shadows and whether you want to take extra exposures to further improve shadow detail (as Bart suggests).

In practice I just look at a scene and decide whether I need to bracket and how much. A more empirical approach might be preferable but so far at least I haven't followed one.
 

Doug Kerr

Well-known member
Esteemed colleagues,

First, Carla and I send best wishes for a happy new year (CE).

Secondly, let me apologize for my lack of attention to matters on the forum for several months. I have been heavily involved in a project on another front, which I am at the moment not at liberty to discuss generally.

Bart, thanks so much for your excellent introductory essay on the matter of scene luminance range and the enhancement of the effective dynamic range of a photographic chain through the compositing of multiple images taken with varying photographic exposure.

Thanks also to Asher, Michael, and Murray for so aptly continuing the train of thought.

Thanks also to all for reminding us of the difference between using various image compositing tools and techniques to enhance the effective dynamic range of the photographic chain, and the "off-label" use of those tools to create non-realistic art, of which I often say, "Thanks for sharing that with us. It almost looks like a photograph".

Best regards,

Doug
 
I wonder where the math is in arriving at 9 brackets? Can't one just measure the brightest area and the darkest and then from that compute how many steps are needed for a particular camera, about 1 extra for each additional step in DR needed to cover the scene? Do you have a formula or is this just "gestalt"? Surely, all we need to do is to have enough photons in the sensels to compute a number accurately from the voltage in the darkest channels but not so that those receiving more light approach getting filled and even spill.

Hi Asher,

The way I approach such subjects is the following.

I first try to establish the correct exposure that preserves the important highlights without clipping. Since our camera's LCD histogram is not 100% reliable (because it is based on the JPEG thumbnail), I try to use the Live View histogram. Not all cameras offer such a realtime histogram, and it is not exactly of the Raw data either, so I may bracket a few shots with a small EV offset. With time comes experience, so I'm reasonably good in predicting whether the best (longest) possible exposure time without clipping is amongst those. I can verify later with a tool that allows to inspect the Raw data before demosaicing, which exposure to use in the final composite.

All other exposures, for the mid-tones and shadows, will have longer exposure times to increase the number of recorded photons in the darker areas. While a program like SNS-HDR can cope with a bracketing interval of 2 stops, I get marginally better quality when I restrict the EV bracketing interval to 1.3 stops, but that's with my camera, others may find that slightly different intervals work better for their hard-/software combination.

The longest exposure of the range I normally use will probably show some deep shadow signal in the middle of the histogram range, and produce a medium gray shadow preview with completely clipped midtones and highlights.

Depending on the scene contrast, that may already lead to unpractically long exposure times, so that could also be a limit. In dark church interiors I regularly reach the 20-30 sec. automatic exposure time limit for a lens set to f/8 or f/11 for DOF, and at ISO 100. I may choose to increase the ISO to 200 or 400, but they will clip the highlights even more, so it's important that the EV interval doesn't get too large, and that the scene shadows warrant it. After all, each 2 stops (=4x absolute difference) of additional exposure already reduces the noise by 50%, so a lot has usually already been gained when the exposure times reach those limits.

Many shooting scenarios only require up to some 7 exposures with a 1.3 EV bracketing interval. Seven exposures is also the maximum number of automatic brackets for an EOS-1 series camera, I believe that some Nikons go to nine brackets of one stop. When the shadows of the longest exposure still look a bit dark, I'll add a few additional brackets.

I found a very nice discussion in Luminous-Landscape with a worthy explanation by you, Bart here.

I tend to adjust my comments to the particular audience, but the message is consistent.

Cheers,
Bart
 
Top