• Please use real names.

    Greetings to all who have registered to OPF and those guests taking a look around. Please use real names. Registrations with fictitious names will not be processed. REAL NAMES ONLY will be processed

    Firstname Lastname

    Register

    We are a courteous and supportive community. No need to hide behind an alia. If you have a genuine need for privacy/secrecy then let me know!
  • Welcome to the new site. Here's a thread about the update where you can post your feedback, ask questions or spot those nasty bugs!

Is it possible to repair this?

StuartRae

New member
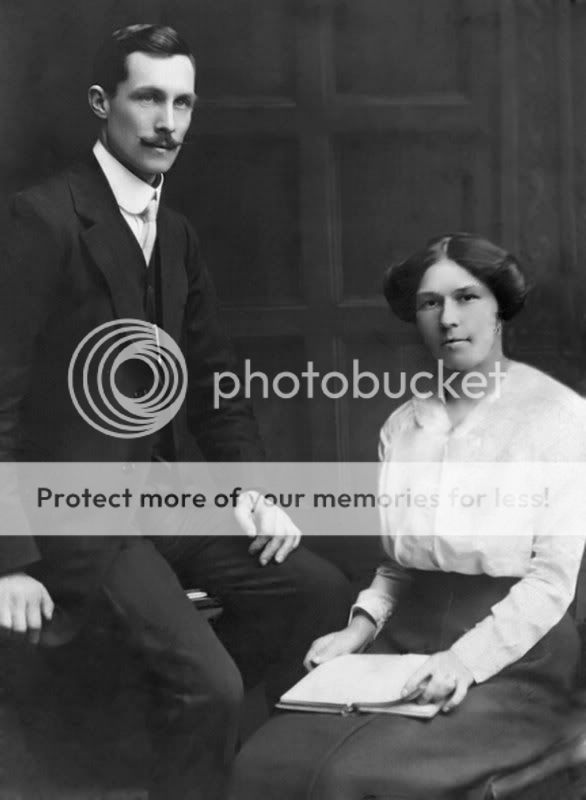
I was hunting through some old boxes the other day - looking for something completely different - and came across this photo of my grandparents.
It would have been taken before WW1, as my grandfather still has his waxed mustache, which he had to abandon when supplies of French wax dried up during the war.

I scanned it in, adjusted levels and de-noised a bit, but didn't make any attempt to repair the blemishes. Most of them I can probably deal with, but the one obscuring part of my grandmother's face is beyond me.

Is there anything to be done apart from laborious pixel by pixel cloning?

Grandparents.jpg


Regards,

Stuart
 

Ray West

New member
Hi Stuart,

I'd scan it at maybe 3 or 4 times the final print resolution - I assume you are going to do a few prints.

Select the problem area e.g. your grans face plus a bit, and copy the selection to new layer, zoom to fit the page, then use the clone stamp - judicious selection of area cloning from, to size of brush/feathering, will get the face done in ten minutes (many different stamp sizes/selections/layers required). Use plenty of layers, and plenty of 'undos', it can be done quickly. The other areas are trivial. I think the hair ribbon needs to be made to look like a ribbon - I thought that was damage too.

Depending on the resolution, it may be possible to do a colour replace on the dark lines, for some of it. It looks like a drop of something spilled on the surface, dried and crazed, or else mould.

It may also pay to straighten the panelling.

Your level adjustment are based on the damage - not the image ;-) The blackest black, and the whitest white are damage areas - you can get it far better. Then play with shadow highlights, etc. There is a fair bit of info in the image, even in this low res jpg.


Best wishes,

Ray
 

Andrew Stannard

pro member
Hi Stuart,

I fancied a challenge so have had a crack at the image....


Grandparents_new.jpg

Image Copyright Stuart Rae 2007


Steps I used were very much as Ray described. When working with the cloning tool I like to leave it at 100% opacity but adjust the flow rate to something like 7%. This way I find it easier to control the 'amount' of image that gets copied. Shortcut keys for changing brush size ( [ & ] ) are also useful.

After scratches and blemishes were manually removed I then ran it through the dust and scratches filter to get rid of the hot pixels. Then a pass through Neat Image to further remove some noise. A bit of levels adjustment was then used to improve contrast.

The face could still do with a bit of work though, I'm afraid your Grandmother has now lost some of the definition in her cheekbones. Was about half an hours work to get to this point.

If you would like me to put a copyright image with your name on the image itself then let me know.


Hope you like,
 

StuartRae

New member
Ray,

Thanks for the advice and encouragement.

Andy,

Thanks so much for sparing the time to work on the image. Yes, I like very much!

And now I know it's possible, I'll re-scan at a larger size and see what I can do. I'd very much like to get a decent print from this photo.

Thanks again to both of you.

Stuart
 

Asher Kelman

OPF Owner/Editor-in-Chief
Stuart,

Would you like to provide the files for us to work on? You can use yousendit.com to distribute the file to those who send you a PM. That way you will know who has the file.

Asher
 

StuartRae

New member
Asher,

I can either upload the file to my server for a limited time, or provide it by email to those who request it.

It will be a 16-bit TIFF scanned at about 300%, size 3.1 Mb.

Stuart

OK, here it is for those who want it.
 

Dave Mitrovic

New member
Stuart,

The best results are achieved by scrutinous pixel study. That is how I removed the hideous stain covering your grandmother's face. I was - and still am, insecure of the shape of her jawline, which is why it may or may not coincide with reality. It is one of those instances I do wish I had the physical photo in front of me. The same goes for the spot on her bosom. I managed to banish the white dots by fiddling around with the dust & scratches filter. If you like my work, you can either incorporate the below present file into your own composition, or I can send you the retouched tiff. Lack of time prevented me from finishing the entire picture. Cheers! :)

Gran.jpg
 

StuartRae

New member
Dave,

That's much better than anything I've managed so far. Thank you very much. The jaw-line looks pretty good.

I can cope with the other blemishes, so I'll have a go at putting your work into the original.

And thanks to anyone who's taken the time to work on this. It's certainly more than I expected.

Regards,

Stuart
 

Summer Day

New member
Grandparents1.jpg

WHat do you think of this all i did was use the clone and healing brush did a few level changes and added a filter it took me about 20 min. if i were to sit down all day the retuching would be better.
 

StuartRae

New member
Hello Summer,

Thanks for spending some time on the image - much appreciated. I've come to the conclusion that the only way to repair this is painstaking work with the clone tool. Eventually after a day of cloning, saving, undoing, etc., I got a decent A4 print.

As for the ribbon in the hair, I think there may be one. In the attached image, the red circle indicates what I think is damage, and the yellow what I think may be a ribbon. It matches a similarly sized piece on the other side.

Ribbon.jpg


Regards,

Stuart
 

Glenn Piper

New member
Hi,

I would recommend the book by Ctein called 'Digital Restoration From Start To Finish'.

When you see what he can achieve it is amazing. The book covers every step and he uses real damaged, faded photos.


Here is a link where you can see examples of the work that is possible.

http://photo-repair.com/

Click on the images to see larger copies and a very brief explanation[/COLOR]
 
Last edited by a moderator:
Top