• Please use real names.

    Greetings to all who have registered to OPF and those guests taking a look around. Please use real names. Registrations with fictitious names will not be processed. REAL NAMES ONLY will be processed

    Firstname Lastname

    Register

    We are a courteous and supportive community. No need to hide behind an alia. If you have a genuine need for privacy/secrecy then let me know!
  • Welcome to the new site. Here's a thread about the update where you can post your feedback, ask questions or spot those nasty bugs!

Photoshop - the pen tools

Doug Kerr

Well-known member
Photoshop makes various uses of paths. A path comprises one or more open or closed curves, where "curve" includes those of which one or all segments are (straight) line segments. These are "vector" constructs.

Each segment is a cubic Bézier curve (the line segments being a "degenerate" case). Each Bézier curve is defined by two anchor points, each of which has an associated control point. Where two segments join, the two anchor points coalesce, and there are now two control points associated with it.

If we manually construct a curve, we essentially do it by emplacing the anchor points and the control points.

If we modify a curve, we do so by manipulating the anchor points and control points.

Photoshop's main arsenal of tools for this are the "pen" tools. They are surrounded by a complicated structure intended to allow each tool to serve multiple purposes. Accordingly, a skilled operator can do many things to a curve with only one tool in effect. It may do one thing when aimed at an existing curve but not at an existing point, another thing when aimed at an existing point, and a third thing when not aimed at any place on a curve. Then the use of the Control, Shift, Alt keys further alter the behavior. Conceptually, a tool could have 24 different "bites".

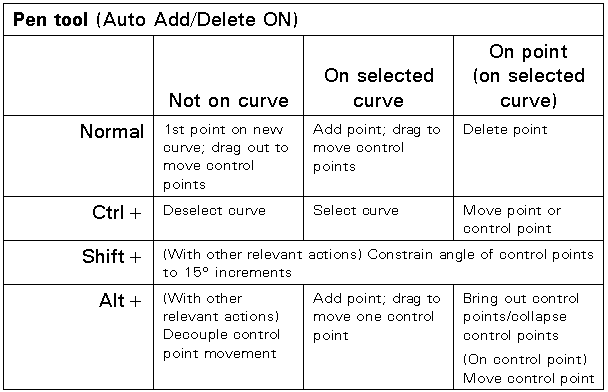
I have prepared a series of charts that present most of the implications of the different bites of the five tools in the Pen family. My first cut at this can be found, as a PDF file, here:

http://dougkerr.net/Pumpkin/articles/Photoshop_pen_tools.pdf

Just as a teaser, here is one of the charts - for the the "Pen" tool itself, "the leader of the band", with the Auto Add/Delete option in effect:
Photoshop_pen_tools_02.gif

Best regards,

Doug
 

Asher Kelman

OPF Owner/Editor-in-Chief
Doug,

I'm truly and duly impressed by your stoic attention to detail, enabling you to filter logic out of a a strangely set up paradigm. The pen tool is famous being less accessible than most other PS tools. Still the rewards are great for drawing sophisticated curves with great control. If anyone finds equally well done videos, let's add them too!

Thanks for the great contribution.

Asher
 

Doug Kerr

Well-known member
Hi, Asher,

Doug,

I'm truly and duly impressed by your stoic attention to detail, enabling you to filter logic out of a a strangely set up paradigm.
Thanks so much. The arrangement is curious indeed.

I basically learned vector curve walloping in my favorite technical illustration program, Designer. Its tools are more straightforward than those of PS, but don't give the user the ability to use one tool for most of the work.

Particularly useful in PS when modifying an existing curve is the Add anchor point tool. With it (and your off hand on the cluster of Ctrl-Shift-Alt keys) one can do essentially all the principal point manipulation operations.

Best regards,

Doug
 

Doug Kerr

Well-known member
My set of charts on this matter is a work in progress, and I am now in the phase where I try to move it from "85% correct" to "98% correct".

I will periodically update the PDF file, usually without notice. The same link will bring the latest "published" version.

Of course, the whole story is so complex that I can't (or won't) try to put every curiosity known to me on the charts.

Best regards,

Doug
 
Last edited:

Doug Kerr

Well-known member
Hi, Sandrine,

I found that one, I didn't see it entirely: tell me if it's useful...HTH.

http://revision3.com/pixelperfect/pentool
That is very well done, and very useful. It really covers a large fraction of the area of the Pen tool.

Note that he has Auto Add/Delete checked in the ribbon for the Pen tool. If we do not, the behavior is not entirely what he describes.

He covers a lot of stuff, but very clearly.

As with many things like this, one may wish to do back from time to time to see exactly what he did.

Thanks for the link.

Best regards,

Doug
 

Doug Kerr

Well-known member
I have two comments on the video on the use of the Pen tool.

1. This is a technical niggle. He says that paths saved with the document do not add anything to the file size. That is of course not reasonable. In fact, each path saved adds a few hundred bytes to the file - certainly inconsequential, but not in fact "none". (His later discussion is more in line with this.)

2. At about 08:01, he selects the Direct Selection Tool to move some segments, or some points, of his path around.

We need not go to that trouble. With the Pen tool in use, if we hold Ctrl, the Pen tool becomes essentially identical to the Direct Selection Tool.

Best regards,

Doug
 
I like very much Bert Monroy...
One of my goal in life is to have the same working space/studio as his :) (but It may seems to me that I already told about that). His work has nearly nothing to do with Photography, but it's very impressive on the way he masters his tools to accomplish a vision. He is also a great teacher... I still not taken the time to see the video. :)
 
It's because you haven't seen his shed! :)

No, joking aside, it would be a nice place to work anyway, and it doesn't go without taking pictures as well. The two of them are still achievable.
 

Doug Kerr

Well-known member
This little video is clear and concise in terms of beginning to use the Pen tool:

http://www.youtube.com/watch?v=IDrtyNmp3A4

Andy Dunn is a man with serious obsessions.

The viewer of this little tutorial may not grasp exactly what the Andy is doing with the wonderful Alt "button" (here in the US we call it a "key", eh?).

One can have a path made of Bézier curve segments with conventional smooth joints that closely simulates a circle, but it's hard to make "by hand". Andy feels (without saying it very clearly) that it is easier to make a circle (or substantial portion of one) out of several Bézier curves, the starting end of each having a zero length direction line (which we can colloquially call "no direction line"). [I tend to agree, with some reservations.]

When we have placed a point on our path to complete the current segment, and drag out the control points to make its "ending" direction line, Photoshop makes two symmetrical direction lines. The second one will be the "starting" direction line for the next segment (Photoshop assumes that we will make one).

If we don't make another segment, but deselect the path to indicate that we are done with it, Photoshop will reel in (essentially, kill) that "forward looking" direction line, so we don't end up with a finished path with a "flying" direction line.​

We are going to make another segment, but we don't want it to have a starting direction line.

So, after depositing an anchor point, and dragging out the pair of direction lines, we hold the Alt key and click on the anchor point. If we click on a terminal (not intermediate) anchor point with Alt depressed, the "forward looking" direction line line there is reeled in (or killed, if you would rather look at it that way). Then when we click to place the next anchor point, the new segment does not have a starting direction line (which is what we want - or rather, what Andy Dunn wants).

Could I make a story like this up?

Best regards,

Doug
 

Andrew Rodney

New member
Then when we click to place the next anchor point, the new segment does not have a starting direction line (which is what we want - or rather, what Andy Dunn wants).

Its what I want too as it makes the process of using the tool far easier for me. He’s criticized on the video for saying you can only make the curve less than 90 degrees, uses four points when ‘only two is needed’ but I have a heck of a time making a circle with only two points, its super easy with four using the Alt/option “trick”.
 
I, once had a friend who took digital design courses in a school.
She told me that the main teacher gave them a very short courses on the pen tool (on Illustrator, but it's the same behaviour in Photoshop) and then gave them : a circle and a few other more complicated shapes to draw. He observed who were naturally confident in mastering the Bezier curves (more understanding the concept than the tool) and said at the end of the session that there are some people "with" and some people "without" (being "without" does not jeopardize your future :) ). It was an observation he made long ago and it was reproducing every year with new students. She was a "without", I reckon I am a "with".

I never learned Bezier theory at school. For the teacher, mastering the tool has nothing to do with understanding the mathematics inside. It's a brain ability.
 

Doug Kerr

Well-known member
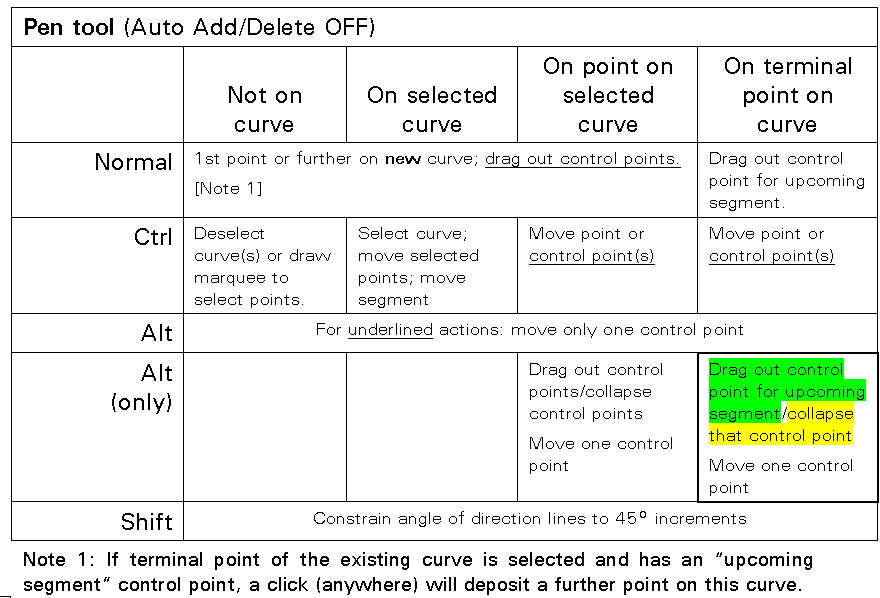
Here is the latest version of the table for the Pen tool proper:

Pen_chart_V2.gif

The clause highlighted in yellow (in the bold-outlined cell toward the lower right) is the provision exploited by the technique described by Andy Dunn and endorsed by Andrew Rodney.

What is this all about?

If we have an "active" path (one that is still being drawn), if we "hauled out" direction lines on the last anchor point we have so far made, there will indeed be two direction lines, one "forward". There is of course no further segment for which it will be the "beginning" direction line - I call it a "flying direction line". But it will be the beginning direction line for the segment created by the next anchor point (if we in fact lay one). In the technique under discussion, we don't want the next segment to have a starting direction line.

As seen from the yellow-highlighted clause, if we Alt-click on the anchor point, it will collapse only the "forward" direction line (control point), just what we need.

This then leads to a related issue. Suppose we have drawn an open path and deselected it. But we discover we should have made a further segment. Can we select it and then deposit a further point? Not directly. For one thing, which terminal anchor point would be the "joint" from which the next segment would proceed?

Well, suppose we select one terminal anchor point (we can draw a marquee around it with Ctrl-drag of the Pen tool). Can we then deposit a further anchor point? No. What would be its starting direction line? (Maybe we don't want it to have one. Tough!)

So we must establish a "flying direction line" from the anchor point from which we wish to proceed. We do that with the Pen tool by Alt-dragging on that anchor point. (This exploits the clause highlighted in green on the table above.)

Having done that, the path is "open for more work". If we then click someplace, that lays the next anchor point, defining a new segment (from the previously-terminal anchor point). (Note 1 tells us this will happen.)

Suppose in fact that we do not want the added segment to have a starting direction line. (To be technically precise, to have one of zero length.) Then, to reinstate the path as "ready to be added to", we just Alt-click on the current terminal anchor point (no drag). This in effect makes a "flying direction line" but of zero length.

As before, the next click (anyplace) will lay a further anchor point, creating our new segment.

Best regards,

Doug
 

Doug Kerr

Well-known member
A little more discussion about the Dunn technique for making a path that closely follows all or part of a circle.

I will work here to cover 180° of the circle with two segments (90° each).

At "9 o'clock" on the circle, using the Pen tool, I deposit the first anchor point. I do not drag out any direction lines. Therefore the segment that I will soon make will have a zero length starting direction line (we can reasonably think of it as not having one at all).

Now I go to 12 o'clock on the circle, press the mouse button (to deposit the next anchor point), and without releasing the mouse button, drag generally to the right. This "drags out" a pair of asymmetrical direction lines; the tool pointer will be on the "forward" control point. Without releasing the mouse button, maneuver the forward control point (and the other - the one we actually care about - will follow, symmetrically) until the curve best fits the quarter of the circle we wish it to emulate.

Note that this will happen when the line between the two control points is not horizontal, bur rather tilted a little to the left.​

Now, we give the forward direction line zero length (with the famous Alt-click), go to 3 o'clock, deposit an anchor point there, and drag out and maneuver a pair of direction lines until it best follows its quadrant of the circle.

Now, are these two segments exactly circular arcs? No, not quite. Is this a big discrepancy? No.

Is the joint at 12 o'clock precisely "smooth"? No, it will have a small "bump". Why?

Well, the ending direction line on the first segment is not horizontal, so the tangent to the curve there will not be horizontal, which it would need to be to make a smooth joint to the next segment.

Is this a big discrepancy? No.

Can a Bézier segment be a closer fit to a 90° circular arc, one that also will make smooth joints? Indeed. But it is more work to make this so. Let me illustrate that by doing it here.

At 9 o'clock on our circle, I lay the first anchor point, and I then drag directly upward (holding Shift will help me do that precisely) to make an appropriately long "starting" direction line for the segment about to be created.

How long is appropriate? Well, actually, 0.55228 times the radius of the circle would be ideal Of course, we have no handy way to do that. But perhaps by eye we will go "halfway to the height of 12 o'clock".

Now we go to 12 o'clock, press the mouse button to lay a new anchor point (completing the first segment), and drag to the right, exactly horizontally (use Shift) until the segment best fits the circle. (Guess what distance that will be, approximately!)

Now, since we couldn't make the direction lines the ideal length, we may have to fiddle with the control points to get the most exact match to the circle.

Thus we can see that this technique is not attractive unless we need an especially scrupulous match to the circle for some reason.

But it is nice to know how to do that if the need arises.

Best regards,

Doug
 

Doug Kerr

Well-known member
Hi, Sandrine,

I never learned Bezier theory at school. For the teacher, mastering the tool has nothing to do with understanding the mathematics inside. It's a brain ability.
Indeed, understanding the math is of little help to actual use. Understanding the conceptual "mechanics" is very helpful.

But, like parking a car (or even bringing it to a stop without a little frisson at the end), some people "get it" very quickly, some "get it" only slowly, and maybe only partially, and some (like my mother - regarding the car, that is) never "get it".

Ultimately, it is like fingering on a musical instrument - we just feel what to do to make a B flat, or to play the note symbolized by a certain mark on the score, or to play the note that is the next note in the harmony we are improvising.

But it's hard to learn how to do that on a saxophone without reference in the early stages to a fingering chart - it would be hard as hell to just "discoverer" otherwise. (Evidently easier on a guitar.)

Best regards,

Doug
 

Doug Kerr

Well-known member
Well, as I further contemplated the multiple personalities of the Photoshop Pen family tools, I find that my early summary charts were not complete and fully accurate.

The document is now at Issue 2, which presents my best current understanding. It is available at the same URL as previously given:

http://dougkerr.net/Pumpkin/articles/Photoshop_pen_tools.pdf

Two aspects have turned out to be so complex that they require presentation by way of notes, found on the last page.

I do not in any way represent that this version of the charts is "complete and fully accurate".

Best regards,

Doug
 

Doug Kerr

Well-known member
Hi, Kevin,

That's quite nice. It brought to mind some things I was not alert to.

The language of explanation is lovely, as is the tutorial approach. It is throrough and careful without being tedious. I can see why you commend this piece to us.

I have some very small technical quibbles. One is that part of the behavior he summarizes in his "bullet points" (page 2) - 3rd and 4th bullets - depends on the Auto Add/Delete mode being checked on. He never really tells us that.

Later, he mentions the desirability of having the Rubber Band pen mode checked on. In his illustration for that for Photoshop 6, that check box is seen as adjacent to the one for Auto Add/Delete, and his illustration shows both checked ON, but he never calls attention to the matter of Auto Add/Delete.

That's a very small quibble indeed. But the user who doesn't attend to it will be wholly baffled when his Pen tool doesn't behave as seen in the rest of the tutorial.

Thanks for the reference.

Best regards,

Doug
 

Kevin Stecyk

New member
For KelbyTraining.com members, they can watch an excellent video called Mastering the Pen Tool.

I believe the link is here: http://www.kelbytraining.com/player/index.html#tab\browse/section\categories/category\all/course\94

Again, you need to be a KelbyTraining.com member to view. For those who don't want a yearly subscription, I believe they offer a one month subscription too.

If you are deep diving into this stuff Doug, you might find this tutorial helpful. The video lasts somewhere between 1.5 -2.0 hours.
 
I've never used it as I find it pretty annoying, but it may help beginners to know that you can effectively see where you are going to "shape" the path with the pen tool. To do this simply tick "rubber band" under the little drop down arrow (pen options) at the end of the pen tool top menu, near where the "shapes" are.
 
Top