![]() |
|
HOME
FORUMS
NEWS
FAQ
SEARCH
|
|
#1
|
|||
|
|||
|
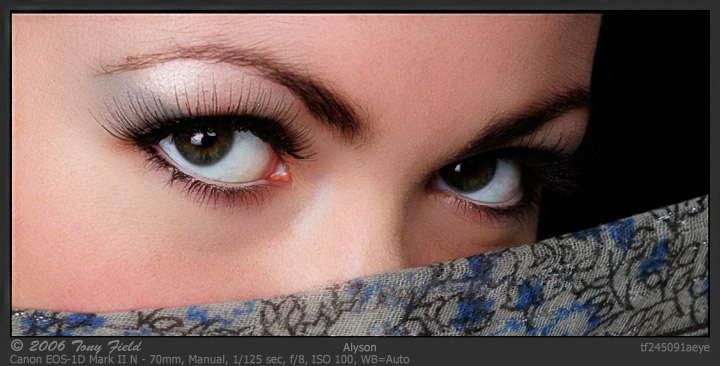
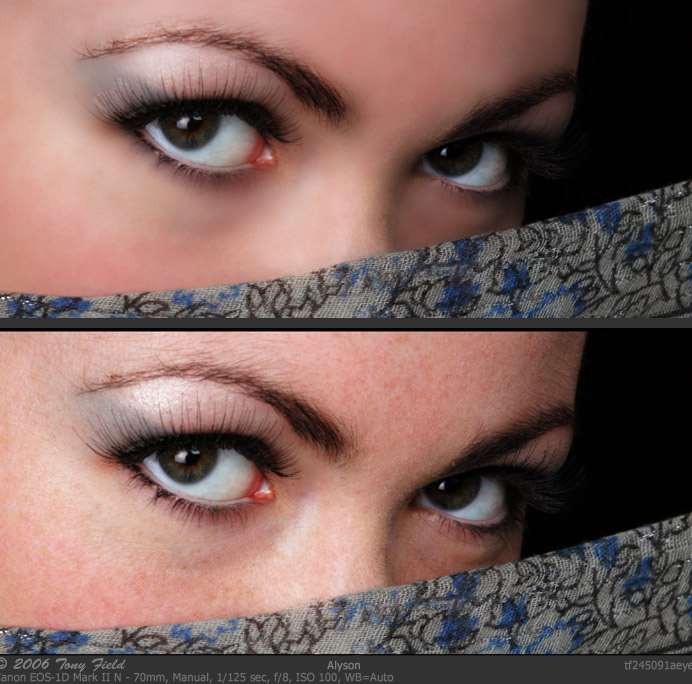
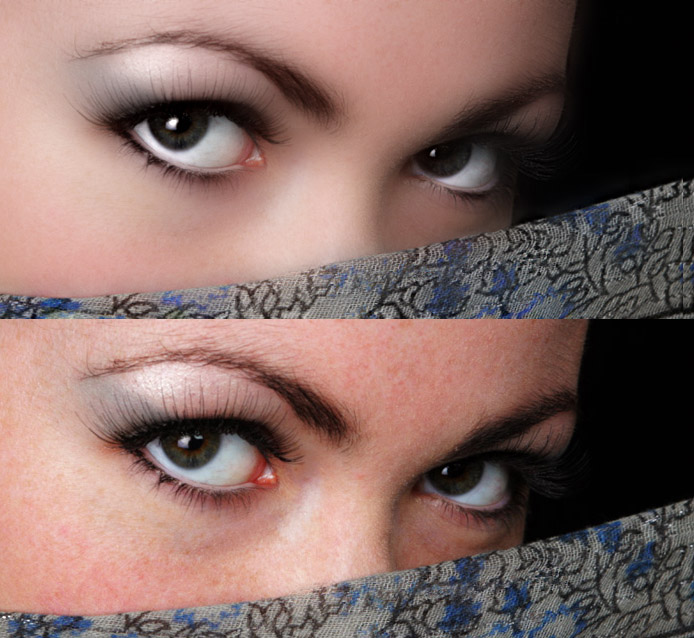
Sometimes I shoot ladies that have interesting skin attributes. The picture below illustrates the problem - the lady has a splotchy skin. Of course, I can clone / heal this with photoshop however that is a very time consuming task if more than one image must be processed.
Are there any basic makeup techniques I can use to mitigate this skin texture? Any good books you would recommend?
|
|
#2
|
|||
|
|||
|
This I'm afraid is a Stephen Eastwood moment.
Women come in like that to his studio. Their pictures end up being envied by every young woman that buys those posh gloss magazines. Stephen, or a magic wand, take your pick! Actually there are a host of ways to improve the skin. Let the healing begin! Who wants to try? Asher |
|
#3
|
|||
|
|||
![]() Kodak has a plug in called Digital Air Pro which allowed some improvement. Hope I didn't offend by editing and re-posting. Does this help any?
__________________
Jon |
|
#4
|
|||
|
|||
|
Mac,
That looks better. Could you try one step further? Maybe copy the layer Gaussian blur and then erase over the eyes and blend back to taste. Asher |
|
#5
|
|||
|
|||
|
Bonjour Mac
I'm not a specialist in retouching skins but I tried in PS to select reds and pasted them as a layer, then applied Noise Ninja with "color noise" reduction only, took approx 30 sec. : ![]() Also be aware to post sRGB not Adobe RGB, most of Windows browsers are not ICC compliant and interpret badly Adobe RGB file (well all other than sRGB)... Also 2 : Asher is fully right, pay a visit to Stephen Eastwood website, a lot to learn there! Hope it helps |
|
#6
|
|||
|
|||
|
Hi,
One of the most important things is a good MUA. They will now how to camouflage the imperfections. After that you can opt to use very soft light from very close by the face. The final thing will have to be PS I'm afraid. But with a good MUA you will have a huge advantage. Greetings, Frank |
|
#7
|
|||
|
|||
|
Frank,
Glad you are here! In the morning we'll make sure you are set up right! Asher |
|
#8
|
|||
|
|||
|
Nicholas,
Thanks for the much improved image. I am no expert, but just thought I'd throw something out to get things started. Also thanks for reminding me about sRGB -- sometimes it slips past me early in the AM...
__________________
Jon |
|
#9
|
|||
|
|||
|
Quote:
__________________
Jon |
|
#10
|
|||
|
|||
|
Erase most of that GB layer with a soft edge, leave more at the top left hand temple area where the skin is most cobble-stoned. Blend in the minimum needed to smooth.
Asher |
|
#11
|
|||
|
|||
|
Quote:
I guess you are looking for methods to reduce the blotchiness of the skin with makeup before you shoot the girls. 1. to reduce the red in the skin you need a concealer before applying the makup. examples are here: http://www.wyb.com/bn_neut.htm In this case I would suggest the Mellow Yellow or one of the Red Neutralizers. For beginning I would start with the NR-2. These concealers are available from different companies. we are using ben nye or Numeric Proof. 2. The best book I've seen about makeup is Making Faces by Kevin Aucoin http://www.amazon.com/gp/product/031...Fencoding=UTF8 You need some experience in Makup for it, but even for beginners it explains very easily what you must know about makup and he was really a genius. To sad he has died already. 3. To cover this up in Photoshop I would second Nicolas, one of the most effective methods to smooth skin is to use a Noise Suppression tool over the skin set for removal of color noise. If you select only the red channel you should be able to remove the blemishes very well. I normally take the Profile for the 1 Ds Mark II (you should try a profile of a camera you own and check the results) and select the ISO800-3200 profile depending on the smoothing I want to achieve. Fine tuning is done in a new copied layer with the opacity slider. Hope this helps Frank |
|
#12
|
|||
|
|||
|
Hi....... I made a duplicate layer and applied Noise Ninja and then I used the air brush at 23% opacity and lightly applied a less red skin color over some of the areas that had some red blotches still in the skin.
Here's a link to that image: http://img122.imageshack.us/my.php?i...touched3av.jpg Last edited by Bernard Wolf; June 6th, 2006 at 09:23 AM. |
|
#13
|
|||
|
|||
|
Hi Frank,
Many thanks for the basic process of the makeup. Thanks for the Aicoin reference. The local book store had Making Faces and also Face Forward - I picked up both. I will try your prcess on my wife soon. |
|
#14
|
|||
|
|||
|
Thanks to all of those who suggested the noise reduction process. Works very well for this particular lady. The nice thing about the this method is that it does not seriously harm the face detail - the various blur processes really manage to degrade the detail while smoothing the skin. After the noise reduction, a slight amount of blur can be used to soften the skin without making it too plastic-smooth.
|
|
#15
|
|||
|
|||
|
Hi Tony
I too have taken the liberty of reworking your image. You asked about ressources for retouching. There are two books which I can strongly recommend: Katrin Eismann: Photoshop Retouching and Restoration - a must for retouchers. Martin Evening: Photoshop for Photographers. However, IMHO, the best way is learning by doing - provided that you have the right tools. After years of trying to consistently reproducing the right glamour look, I have for the past two years used the highly appraised tools developed by some of the best photographers and Photoshop experts - teamed up in what they called PixelGenius (www.pixelgenius.com.) They have three different components available as try-outs. Again IMHO, the most important thing for a digital photographer is to establish a workflow, that allows you speadily and consistently to produce images to a high standard. Using the PixelGenius plugins this is turned from being a tedious, cumbersome job to a swift and natural part of your workflow. ![]() Best regards Michael |
|
#16
|
|||
|
|||
|
Welcome Michael!
You did a beautiful job. I wonder what you would think of blending in Nicolas' effort by about 3-15%? If the skin is too porcelain, the women might feel that they could never ever look like that. Women buy Vogue™ to see something they can't see in the mirror! Sometimes, instead, they like a picture, when it is of themself, that it is what they really are, (if not for bacteria) or the wind and sun! Asher P.S. I'd love to see a link to your website in your profile and signature: is it safe? |
|
#17
|
|||
|
|||
|
Quote:
I have to second the use of Pixel Genius software to aid in the retouching of skin. Photokit Sharpener is what I use and it has some smoothing & sharpening brushes that allow you to do very selective enhancements. These enhancements always end up as a layer automatically. Photokit Color is also useful for skin. |
|
#18
|
|||
|
|||
|
I've been struggling with skin for so long and this is an interesting topic. I have several skin softening actions and have tried the photokit softening brushes, neat image and well a lot of other techniques including the spot cloning. But really who wants to do this with every image? This takes a lot of time. Make-up definitely helps and is the right idea since it will fix every shot, but in SF a good MUA costs $150-300/half day. I've got both the Kevin Aucoin books and they are awesome resources but I am spending enough time getting good at photography.
Sometimes I will deliberately over expose the skin so that the red blotches are just basically blown out but that's not such a great solution. What's wierd is that I don't remember having this trouble with film - why? What's so different with digital? |
|
#19
|
|||
|
|||
|
Quote:
A more precise explanation is that with single use celluloid sensors the signal to noise ratio decreases drastically as you get close to the extinction resolution (this is a good thing for some subjects) while silicon sensors tend to have a relatively uniform signal to noise ratio right down to the extinction resolution. So while film may resolve finer details than digital can capture (past the extinction resolution of the sensor) those details on small format film captures are muddy and washed out. This muddy and washed out character of 35 mm film is the raison de etre of medium and large format celluloid capture as the easily seen details all come from far above the extinction resolution where the signal to noise ratio is high. my $0.02, Sean enjoy, Sean
__________________
"In the End, we will remember not the words of our enemies, but the silence of our friends." - Martin Luther King Jr. (1929-1968) http://www.envisagement.com/ |
|
#20
|
|||
|
|||
|
Quote:
![]() It took more time to start PS than it did to fix the skin. Albeit, this is not helpful if you want a color image and you are already on the right track there. Nonetheless, since her skin in the red channel is already flawless, I would not apply any changes to that and would limit any noise reduction or blurring to the green and blue channels. enjoy, Sean enjoy, Sean
__________________
"In the End, we will remember not the words of our enemies, but the silence of our friends." - Martin Luther King Jr. (1929-1968) http://www.envisagement.com/ |
|
#21
|
|||
|
|||
|
I came cross this piece of software today and thought of this post.
Looks like it has potential. I have not tried it nor do I have any affiliation. http://www.portraitprofessional.com/index.php It's meant for smoothing skin imperfections. Jeff |
|
#22
|
|||
|
|||
|
For windows! Anyone use this?
Asher |
|
#23
|
|||
|
|||
|
I’ve downloaded the demo, and it seems a bit of a gimmick to me.
Still is only £15, so for pictures of family and friends, it will be a good laugh. I wouldn’t use this for professional touch-up
__________________
Kind regards Ivan Images posted within OPF are assumed to be for Comment & Critique, unless otherwise designated. |
|
#24
|
|||
|
|||
|
Quote:
Asher |
|
#25
|
|||
|
|||
|
Oh no, I bought it!, it will be great fun.
Here is a before and after of a snap I took last year. You guys can make your own minds as to whether you will use this for a pro shoot. I know I wouldn’t lol Before ![]() After
__________________
Kind regards Ivan Images posted within OPF are assumed to be for Comment & Critique, unless otherwise designated. Last edited by Nicolas Claris; September 6th, 2007 at 12:42 PM. Reason: relink… |
|
#26
|
|||
|
|||
|
Seems not to be all that great! I had downloaded the demo, but I don't think I'm even going to install it!
Jeff |
|
#27
|
|||
|
|||
|
could also try new layer, gausian blur (a lot) take a snapshot and set that as the history. go back to new layer then use the history brush over the skin set to lighten and then darken. Erase areas of detail and adjust the layer opacity to suit.
|
|
#28
|
|||
|
|||
|
Quote:
While the concept works well, I would warn anyone using CS or newer away from the history brush (this was the only way to do a lot of 16-bit work pre-CS). By using a new layer with a Layer Mask you can achieve the same effect while gaining the ability to save, quit PS, and then continue on another day. The reasoning here is that the History Brush uses History states. And History states are not saved with the file. Whereas if you simply duplicate a layer, run the filter, and than ad a Layer Mask you can paint things on in the same fashion. But the Layer Mask is saved with the file unlike history states and this style of working is valuable with detail oriented/picky clients. The downside is this makes your PSD files significantly larger. But the goal here is human efficiency and not saving disk space. enjoy, Sean
__________________
"In the End, we will remember not the words of our enemies, but the silence of our friends." - Martin Luther King Jr. (1929-1968) http://www.envisagement.com/ |
|
#29
|
|||
|
|||
|
Quote:
It isn't clear from your post exactly what "final look" you are after. I don't know if the "whatever I did" below is what you had in mind. ![]() Regards, Joe Kurkjian |
|
#30
|
|||
|
|||
|
This version show a bit more skin texture than the one above. Again, I don't know if this is the look you are after???
![]() Regards, Joe Kurkjian |
![]() |
| Bookmarks |
| Thread Tools | |
| Display Modes | |
|
|