• Please use real names.

    Greetings to all who have registered to OPF and those guests taking a look around. Please use real names. Registrations with fictitious names will not be processed. REAL NAMES ONLY will be processed

    Firstname Lastname

    Register

    We are a courteous and supportive community. No need to hide behind an alia. If you have a genuine need for privacy/secrecy then let me know!
  • Welcome to the new site. Here's a thread about the update where you can post your feedback, ask questions or spot those nasty bugs!

Difficult light - RAW conversion

Michael Fontana

pro member
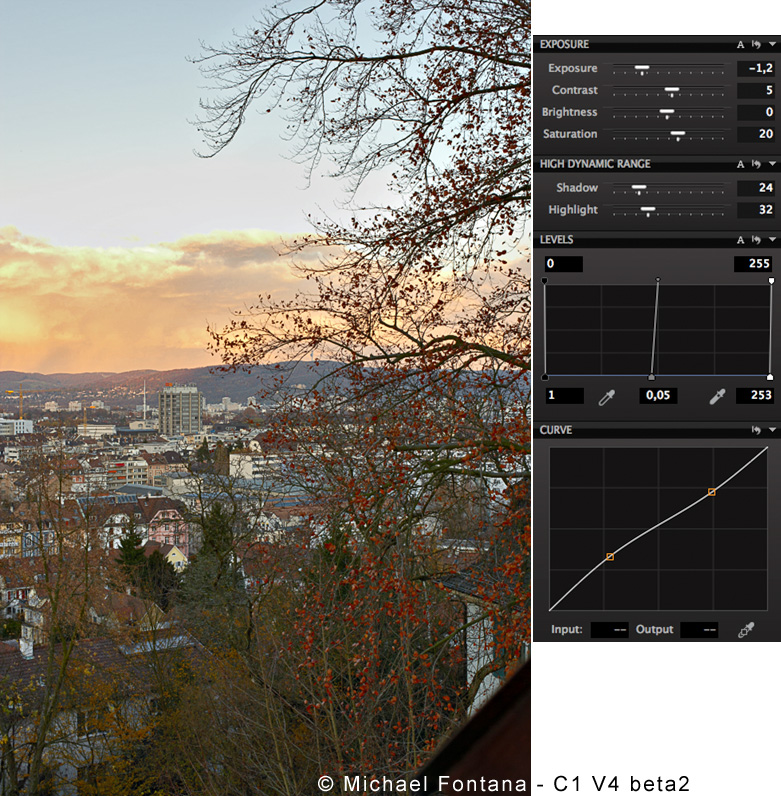
Yesterday's shots were done in a difficult light situation: after a shower, the sky opend up fast; the light had much blue, meanwhile the sun made the clouds very warm:

sky.jpg


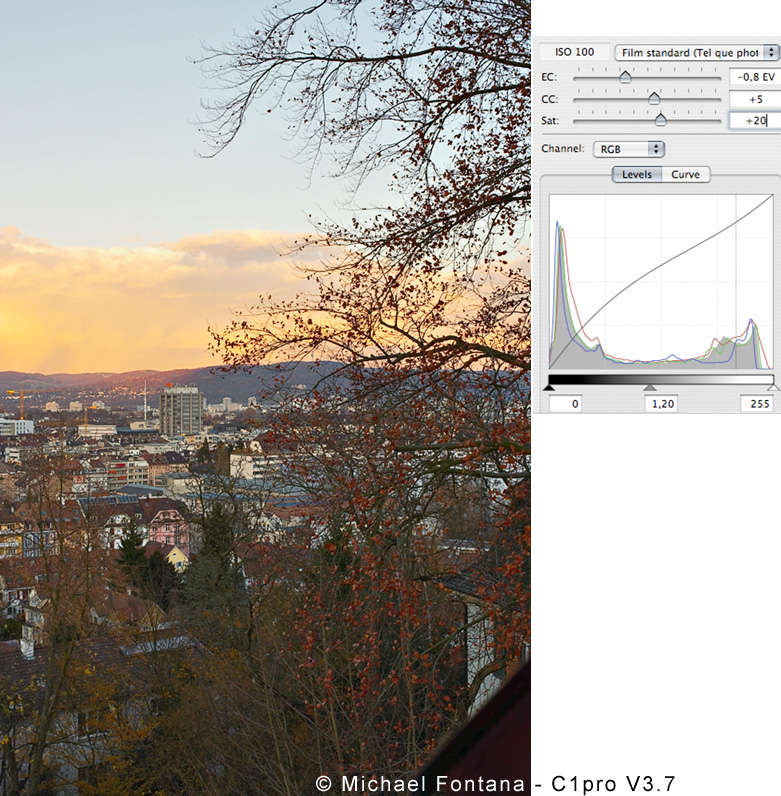
Usually, RAWconversions don't give headaches to me, I still remember the day when ACR 1 came out, as a plugin for PS-7 ;-)

But that one is difficult; one has to balance the colors from highlights to shadows as well. The local contrast for these two extremes has to be set different as well.

So how to convert best?
I made several attemps, with different converters; but either the town looks dull and generic, or the clouds miss the atmosphere, shown in the screenie above.

One way could be to let it "cold" and apply - after RAWConversion - a warm Photofilter in PS-CS-2, to reduce the blue. In PS too, the local contrasts for S+H can be set manually. But it's not extra-good looking...

I uploaded one of the RAWfiles, a plus 1.5 f-stop-shot, out of the bracketing - -1.5f, 0, + 1.5 f - , its the file at the very right end, so you might look yourself:

klick for download
 

Tim Gray

New member
The line between the sky and town is pretty well defined. Convert 2x - once for the sky and once for the town and use a small gradient blend to combine.
 

Greg Rogers

New member
Hi Michael,
Since you have the bracketed images anyway, have you given HDR any thought? I've been doing quite a bit of experimenting of late applying HDR to bracketed images even if one of them is more or less within the dynamic range of the sensor, with some interesting results.

But then you've likely already considered this.

Regards,
Greg
 

Michael Fontana

pro member
The line between the sky and town is pretty well defined. Convert 2x - once for the sky and once for the town and use a small gradient blend to combine.

Tim, these have been my first thoughts, too; but then the color shift in the city itself, too.
The reason of it: the sun didn't enlighted the clouds only, but parth of the town, too.

But you're righ: after several attemps, I'm pretty sure that no converter can handle these images in just one go; beside the colorshifts themselves: the WB influences the contrast as well...
 

Michael Fontana

pro member
Hi Michael,
Since you have the bracketed images anyway, have you given HDR any thought? I've been doing quite a bit of experimenting of late applying HDR to bracketed images even if one of them is more or less within the dynamic range of the sensor, with some interesting results.

But then you've likely already considered this.

Regards,
Greg

Yep Greg, that's what I was doing, the pano is rendering right now. A HDR works best, if the input is as good as possible; so my question was about the conversion.

You won't believe it - but LRs automatic settings for WB and tonal adjustements - as a starting point worked out to be best - for using it with HDR !! Some others RCs, which I usually like more, weren't better!

I dunno know why; but maybe LR - in the automatic settings - tries to keep as much data as possible. These sendt to HDR will give a surplus of data.

Still with HDRing; selective edits after HDR & tonemapping were necessairy.
So this beeing rather intensive imaging....
 

Greg Rogers

New member
Ah, I see Michael. Fascinating about the LR auto settings working best, and yes you have your work cut out for you after tone mapping.

I do hope you let us peek at your finished image. I'm only getting my feet wet with HDR so I'd be of no help whatsoever I'm afraid.

Cheers,
Greg
 

Michael Fontana

pro member
Ah, I see Michael. Fascinating about the LR auto settings working best, and yes you have your work cut out for you after tone mapping.

I do hope you let us peek at your finished image. I'm only getting my feet wet with HDR so I'd be of no help whatsoever I'm afraid.

Cheers, Greg

Greg

usually, after tonemapping, I don't need to so many tweaks, as I know Photomatix quite well - but I'm sure, its in the nature of the light here.

The results, when using HDR looks better, but I'm still not really happy:

Pano_N_LR_rect.jpg


Another one, taken about an hour later; I took a full serie from day to night:

Pano_I_zyl.jpg


You might notice the different projections - out of the stitcher: the "golden" one is flat, = rectalinear, meanwhile the blue one is cylindric.
 
The results, when using HDR looks better, but I'm still not really happy:

Hi Michael,

You may need to darken the blue sky area with a gradient.

Here is what I made of the Raw file you provided:
[
GF_Staren_Pano_N_13_SH_PMPDE.jpg


My problem was that I didn't have the HDRI version available, so this is what I did.
I made 2 Raw conversions in ACR:
1. with a daylight colortemperature and reduced exposure (no highlight recovery because that can result in dull highlights) to recover all sky highlights without clipping and with good contrast (could have added a curve here), and vibrance at 66.
2. with a much cooler WB at 4900K and enough exposure increase for well detailed cold shadows.

I then combined, after some other unsatisfactory blends, the two renderings to a phony HDR in Photomatix, and tonemapped with its DetailEnhancer (while also warming up the combined/mixed color temperature). I finished with adding some more tonality in Photoshop, before converting to sRGB and downsampling.

That resulted, although I also like your 'warm' rendition, in an enhanced unnatural color perspective between the cooler foreground (it even looks like it's colder than your rendering) and the warm skies, and it darkened the blue sky. I'm not suggesting my rendition is better, it's just very different in character. I tried to have the background gain attention (warmer WB) over the foreground (colder WB) by using 2 different color balances.

The main issue with the scene, especially at a smal size, is IMHO that it doesn't allow a naturally attractive composition. There's a lot of detail in the foreground, but it's all fighting for attention, nothing really drawing the eye in a certain direction. Apparently there wasn't an attractive foreground that would have helped, but one doesn't alway have such luck.

Bart
 
Last edited:

Michael Fontana

pro member
Bart,
short question, so your jpg is in sRGB?
I might upload a direct comparison; having that info.

>but one doesn't alway have such luck.<

that's true; the client fixed the position; its out of his house.
I could choose between staying straight at the 3nd floor vs beeing on my knees, at the attic, out of a small horizontal pivot-hung window; I took the second option ......
 

Ray West

New member
Hi Michael and Bart,

The major problem I see is that of 'scale'. There is a lot of detail in the image. Detail does not scale well in jpeg compression, to the relatively small sizes shown here. The image, printed at ten foot long, say, may look fine, but terrible at 8 inches wide on a vdu. (as in Michael's second image). Much of the image consists of windows in buildings. On a vdu, at the size of Michael's second posted images, it makes it 'noisy', the windows look almost like thousands of random spots on my screen. The slightly closer view, posted by Bart, shows them as windows. The very first image, posted by Michael, does not show the windows the same, since the image is too small for that level of detail to show.

Scale is important. So, what is the final destination - large print, or some vdu based pano file?

Having spent much of my life making scale models, I have found you often have to fake things, to make it look right. Similar principles apply to other art forms. Not knowing the destination, but I would possibly consider applying a graded colour wash over the whole image, and/or selectively blurring of foreground/background. I believe that all large panos of this type of subject (highly detailed) will tend to look 'flat' at a small scale, since there is no single subject, no focus point for your eye to concentrate on, everything is sharp, relatively even illumination.

Now, that's an answer (maybe an excuse), but what was the question?

Best wishes,

Ray
 

Michael Fontana

pro member
Yes, I always convert to sRGB for web publishing (but without embedding the profile to save on file size and gain loading speed).

Bart

That's what I do, too, but it's another thread ;-)

ok, so he' re the 1:1- comparison:

on the left, Bart's one, as posted above; using one file only, and on the right the mine, after HDR, using 3 bracket shots, but one color temperature - in the RC - only:

bart-vs-MF.jpg


With 6150 Kelvin, I've been much warmer, than you Bart. The idea behind it: to "integrate" the town in the warm colors of the clouds. But then my blue sky looks dull....
And no surprise, the real HDR delivers better tonality, especially in the foreground.

To correct my dull sky: a quick and dirt combination of Bart's sky - thanks for your help! - with "my" town; getting better now:

Bart&MF.jpg
 

Greg Rogers

New member
I feel like an fool opining, due to the level of expertise you folks all have.

So I will anyway. Michael, have you tried this processing directly from the RAW files (in Photomatix)? I seem to get better results this way than tweaking the RAW files first in ACR, or whatever RC....and I dont' understand why. That said, I don't want to turn this into a "help Greg with HDR processing" thread, so let's not do that.

I like you second image better from the horizon down, Michael....and the first from the horizon up, though on my monitor it looks perhaps a tad warm.

Regards and thanks for allowing me to opine here,
Greg
 

Michael Fontana

pro member
I think that fixing the white balance can improve the image.

panonlrrectwbjy9.jpg

Grazie, Giovanni!
I opend it in PS, way to reddish..... the nasty point of this light/these shots: there isn't any one-klick solution....

Now, I picked up Bart's sky: a few selective color tweaks with a layermask:
interesting, how a blue-sky biases the entire scene, including all other colors - getting closer to the atmosphere it had when shooting; the town might still be slighty to warm; but better than beeing on the cold side... for these autumn panos.

Pano_N_LR_skycorr.jpg
 

Michael Fontana

pro member
Ray

what you say is correct; I noticed in a other thread here, that panos and computers are not a good team - apart from QTVR or zoomify's, maybe.

I agree also on >will tend to look 'flat' at a small scale, since there is no single subject, no focus point for your eye to concentrate on, everything is sharp, relatively even illumination.<

Yep, pano means to fall into the picture, its detailness and richness of forms and colors, kinda get lost with the eye...

>What's the question<:
It was about the best way to convert these difficult RAWs for getting a fine looking color in shadows AND °pushed° highlights, plus good local contrast in both of them.
Even here, at 100% the colors weren't fine.

Obviuosly a conventional editing-strategy - a single raw-temperature conversion, plus minor edits in PS don't fit; as I have the shots for about 15 panos à 5 to 9 Raws each, mulitplied by 3 times for HDR, that's a hell of a work, even only 5 might be become big panos at the wall.......

What's vdu?
 

Michael Fontana

pro member
Greg

I usually found Photomatix RAWengine less powerfull than the thoroughbred-convertes ones- with less possibilities of edits.

But still an idea - worth a try!

Adding a question:

Does a wider profile-gamut, as PPRGB per example, would help?
 

nicolas claris

OPF Co-founder/Administrator
Bonsoir folks

Now that I know what kind of result Michael is looking for, below are 2 tries from the raw file provided:

Extraction from RCs at 20% of original size, tif 8bit, Adobe RGB, 7200° K, then:
PP in CS2 has been exactly the same on both extraction:
Highlight/shadow: shadow:3 - Highlight 25
then my sharpening action
Convert to sRGB, export JPEG at 8


Extracted with C1 V4 beta 2
GF_Staren_Pano_N_13_NC.jpg


Extracted with C1pro V3.7
GF_Staren_Pano_N_13_NC2.jpg
 
Last edited:
Greg

I usually found Photomatix RAWengine less powerfull than the thoroughbred-convertes ones- with less possibilities of edits.

But still an idea - worth a try!

I have an uneasy feeling about the built-in assumption for the Camera/Device color space in Photomatix. Some of my 1Ds2 Raw to HDR conversions are very hard to color adjust into something accurate. Also, and that's a major shortcoming in Photomatix's Raw for HDR pipeline, one cannot adjust for chromatic aberration. CA will get amplified by subsequent tonemapping! I emailed it as an improvement suggestion, but never got a response. I prefer linear tone curve Raw conversions (+CA correction) as input for HDR construction. Only final output gets converted to the output profile and size.

Adding a question:

Does a wider profile-gamut, as PPRGB per example, would help?

I keep everything, starting with initial Raw conversion, in ProPhoto RGB colorspace as long as needed for postprocessing. Only final output gets converted to the output profile and size. PPRGB is a very large colorspace, but with most of the rigorous processing being done in 32-b/ch it is the safest choice IMHO.

Bart
 

Michael Fontana

pro member
°sniff° Why do I often run in these difficult jobs °sniff°

A lot of thanks to you all, helping me in that battle; this beeing quite a hard nut to knock, but a good example to walk further....

Just made a comparison of HDR with tiffs. resp. RAWs:

As Bart pointed out; color is hard to get right in PMatix, and we have CA, at the gray, wavy roof:

HDR%20with%20RAWS_1.jpg


But then: look at the bottom of the image 2 - in that rather underexposed foreground:

HDR%20with%20RAWS_2.jpg


One question rises:
just coincidence, or does HDR with RAWS does generally pop better in the shadows?
To have a comparison, I run the RAW-HDR from the uploaded RAWfile, = image 7, now...

RAW-HDRing was done in PPRGB.

>PPRGB is a very large colorspace, but with most of the rigorous processing being done in 32-b/ch it is the safest choice IMHO.<

by rigourous editing, you intend HDR, or do you run PS in 32bit/channel? °wondernose°
 
°sniff° Why do I often run in these difficult jobs °sniff°

On the positive side though, if it were easy then anybody with a cameraphone could do it ...

A lot of thanks to you all, helping me in that battle; this beeing quite a hard nut to knock, but a good example to walk further....

We all gain from exchanging knowledge, another one of my mottos.

One question rises:
just coincidence, or does HDR with RAWS does generally pop better in the shadows?

Perhaps it has something to do with ACR clipping the black point to reduce noise (which is a non-issue in bracketed exposures)? Is your brightest exposure in the series doing the shadows enough justice? Resolution is a bit better in the Raw-to-HDR conversion as well. Darned, why didn't the Photomatix people respond to my CA correction suggestions (I even suggested a method that works automatically and also on shifted images), it's a necessity for artifact free tonemapping. I'll have to email them again.

>PPRGB is a very large colorspace, but with most of the rigorous processing being done in 32-b/ch it is the safest choice IMHO.<

by rigourous editing, you intend HDR

Yes, I mean the HDR to tonemapping stage in Photomatix. That's where the potential risks for posterization are the largest.

An alternative route is offered by the Photomatix Tonemapping plug-in for PS. It allows to tonemap in 32-b/ch, stay in that bit depth and do other adjustments offered by PS, and then convert to 16-b/ch with an optional additional adaptive tonemapping and curve adjustment, for the most difficult images. An added benefit is that the tonemapping preview in fully colormanaged in PS. A small drawback is the more limited set of controls in the plug-in.

Bart
 

Michael Fontana

pro member
I run a 2nd RAW-HDR, and the shadows are better as well.
But still the colors.... the green/mag-sliders of a RC are just missing...

The brightest shot is that one, you had downloaded... bracketing is -1 .5, 0, + 1.5 plus the serie looks to be ok.

Another missing point is the capture-sharpening; I had to smartsharpen the RAW-HDR-output.

I might send a mail to Photomatix, as well, as I have not a bad wire with G.
Using the HDR-list would be a possibility, too. I could send its adresse offline...

I have the plugin, too, the actual version has the same sets of controls, as the stand-alone.

But the standalone's results were better; one of the few advantages would be a smartsharpen in 32 bit.....

BTW:


For some other members beeing interested in HDR: since March 07, O' Reilly has a 58-page-pdf, about HDR: "An Introduction to High Dynamic Range Photography"
by Jack Howard... costs a few Dollars; I could download the introduction, and it contains about 8 pages on Photomatix....7 pages about PS-CS-3' HDR.....

Look here

Talking about PPRGB..
might be a good idea to use it in the stitcher as well.....

Nicolas, I'll give C1 tomorrow a try; the eyes are to tyred, now....
 

nicolas claris

OPF Co-founder/Administrator
Nicolas, I'll give C1 tomorrow a try; the eyes are to tyred, now....

Bonjour Michael,

there's a function in C1pro 3.7 that nobody speaks about, it is the possibility to export a 16bit tiff and to re-import it and blend it with a raw file… could be blended with the same with different settings, I never tried it for this purpose, but should may be worth the try… who knows!
 

Michael Fontana

pro member
Merci bien, Nicolas

never heard about it - do you have any sources for that?

last night, I tried again to find a solution, the pict is pretty fine now.

Basically, I sorted out, what is not working, and tried the other tracks.
So RAW-HDR was stopped; and I startet from scratch:

I took a bit from everyone, looking at Nicolas C-1-settings, reminding Barts PPRGB-advice, etc, had a look at the the histogramms of the available 16bits-samples, observed the spices in my RAWkitchen and changed strategy:

As I knew that no klick and save-solution was giving the the desired results, I decided to squeeze any bloody pixel to get - in a first step - the bestpossible image data, aka goodlooking histogramm, vs a goodlooking picture: pumping up - prior to throw away, not the usual way.

As I usually like C1 a lot for shots with sunlight, I converted the RAWS in C1, tonemapped them in Photomatix, and used Lightzone for doing the local adjustements.

LZ has one big advantage vs PS: You can save - with a single klick - all the edits of a image and apply them - with another klick onto other images; this beeing a big help for a serie of shots beeing used for stitching, as they need all to be edited exactly the same, to avoid stitching problems.

This was all done in PPRGB, so a high level of image data was preserved. Some color adjustements in PS, using "Selective Colorcorrection" on layermasks - for sky and clouds followed, then "Color Fringe Reducer", usually fine for CA-corrections, was used to get rid of the little, strange colorshifts beeing particurlier in that special light. This was done with layermasks as well... as the very thin 81-Filter, for getting the town slightly on the warm side.

Off course, I saved alls PS-editings, as loadable file.

It's all a bit of work; but going that track, the foreground is much more attractive, the city colors doesn't look dull anymore, the local contrast is fine, the sky is a sky....

enough of words; the new result is on the right, vs the single image of post 7, with LR.
You might notice the histograms as well....


finally.jpg


Still a unlogical step: The tonemapped tiffs - send to LightZone in PPRGB - have to be saved as Ad98, to look fine and keep the nice histogram..... °zssss°
 

Greg Rogers

New member
Michael, I'm sorry that my idea to run the RAW images directly through Photomatix turned out to be a wild goose chase for you. I feel badly for having wasted your time.

I've never worked with an image as complex as your pano in HDR, and I've had the exact opposite experience.....preprocessing in another RC prior to HDR conversion and tonemapping seems to make matters worse for me. I shall, however be trying it again soon for various reasons.

Oh well, glad you got it straightened out.....

Regards,
Greg
 

Michael Fontana

pro member
no problem at all, Greg

these shots are more delicate in terms of the light and rawconversions, so it's a lesson in struggling through difficult areas, for me too. That's the reason I put it to discussion; as we all learn from each other, here.

Your idea made me trying something I didn't made for a good while, with a quite interesting result, that might be reasonable for other purposes, as b&w, for example.

Kind regards, Michael
 
Michael, I'm sorry that my idea to run the RAW images directly through Photomatix turned out to be a wild goose chase for you. I feel badly for having wasted your time.

You shouldn't feel bad, and you've wasted nobody's time. We're all learning as we go, and we're searching for the optimal workflow. Everybody benefits from the learning experience.

Processing exposure bracketed Raws into HDRs is a great timesaving feature in a complex workflow, it just happens to be sub-optimally implemented in Photomatix, due to the lack of CA correction. I was pleased to see the amount of detail that Photomatix's Raw conversion was capable of extracting from Michael's files. Once CA correction is added, the tool becomes even more useful than it already is.

I've never worked with an image as complex as your pano in HDR, and I've had the exact opposite experience.....preprocessing in another RC prior to HDR conversion and tonemapping seems to make matters worse for me. I shall, however be trying it again soon for various reasons.

You'll get the best results when the individual Raw conversions have a simple gamma corrected linear tonecurve (it's easier for the software to reconstruct the camera's response curve). sRGB images don't have a simple gamma curve (they have a linear toe section) and have a limited gamut. ProPhoto RGB (or Widegamut) colorspace images do have a simple gamma curve and a wider gamut with more accurate color separation, which may help to prevent posterization with extreme tonemapping.

Bart
 

Michael Fontana

pro member
Processing exposure bracketed Raws into HDRs is a great timesaving feature in a complex workflow, it just happens to be sub-optimally implemented in Photomatix, due to the lack of CA correction. I was pleased to see the amount of detail that Photomatix's Raw conversion was capable of extracting from Michael's files. Once CA correction is added, the tool becomes even more useful than it already is. Bart

Bart, the lack of a distinctive WB and tint - a major step in Rconversion - is still a missing point, IMO.

different horses for courses -
I agree completly with the detail-amount... in the example playing well in the shadows, but not in the highlights.

Trying to get the files worked, this evening...
 

Greg Rogers

New member
Bart, thank you for your kind words and advice.

Michael, same to you. Also, my quick fix for the WB issue (regarding running RAWs through Photomatix directly) is to shoot a shot of a gray card as a single exposure, then shoot the bracketed set. I then open the single image first in ACR, click the gray card and take note of the colour temperature, and subsequently plug that number into the 'custom' WB setting in Photomatix prior to HDR conversion. I'm not sure if this method is correct.

I also try to start out by using the gray card to manually set the camera's WB. I'm sort of guessing your pano was taken from a balcony for some reason and if such is the case, neither grey card method would do you any good, unless you had a billboard constructed in the foreground with calibrated neutral gray, then torn down before you shot the bracketed set. <smirk>

The tint slider in RC's has been, and continues to be somewhat of a mystery to me, though I'm slowly starting to sort it out. However, as I believe you mentioned, there seems to be no way to tweak the tint and assuming my method above holds water, which it may not because I may be thinking backwards, it would be nice to be able to input the tint value as well.

I may post a question in a new thread about the relationship between shooting a grey card and tint because I am basically clueless.

Regards,
Greg
 
Top