![]() |
|
HOME
FORUMS
NEWS
FAQ
SEARCH
|
|
|||||||
| Art from Found Photographs Sadly, works get forgotten. A good eye can bring new life if one has humor, knowledge and vision. The used pictures must be either yours, from the public domain or legal rights of usage having been obtained. Be prepared to explain image sources without being defensive or mad at the moderator. This does not diminish your art, just helps with historical provenance. |
![]() |
|
|
Thread Tools | Display Modes |
|
#1
|
|||
|
|||
|
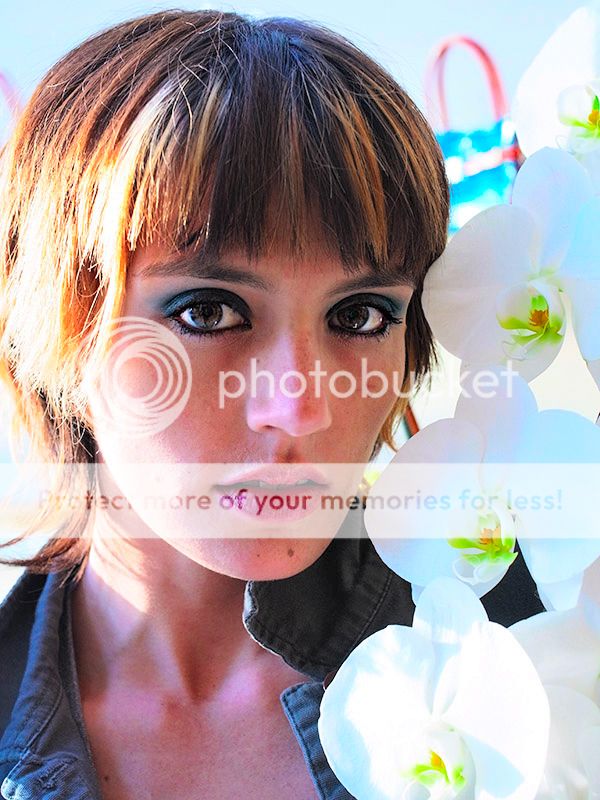
So here's the challenge. Elsewhere I tested the GXR with a 50mm Macro lens to see just what the camera could deliver out of the camera with no fuss or editing and no use of the RAW file. The object there is primarily qualifying a performer for a position in a series of tableaux I'm working on. Still, the pictures have intent behind them and perhaps have a lot more to give than shows as delivered from the camera. This first one is just 450 pixels wide, but the rest are 600 pixels and should all be robust enough for editing.
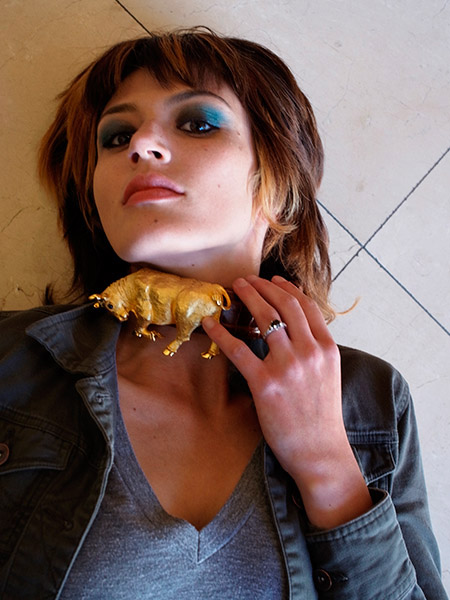
![]() Asher Kelman: Introducing Caitlin with $3500 of gold on her neck! Available light, f4.9 1/20 sec 400 ISO, exposure bias 0.3 EV Visit the thread here and download any one of the images you like and work on them to make them the most impressive as if they were your own. Then repost here. Just disclose how you did what you did to get what you got, (thanks Bart for the aphorism). I know that Fahim has already worked wonder on at least one of my pictures! ![]() Asher
__________________
Follow us on Twitter at @opfweb Our purpose is getting to an impressive photograph. So we encourage browsing and then feedback. Consider a link to your galleries annotated, C&C welcomed. Images posted within OPF are assumed to be for Comment & Critique, unless otherwise designated. |
|
#2
|
|||
|
|||
![]() Asher Kelman 2011 ![]() Asher Kelman 2011 duplicate the original. Covert to grayscale. Or De-saturate. Background copy = color Layer above = monochrome Experiment with blue/green/red curves for effect. Overexpose and blur for glow. Bring up the shadow details for the eye region with curves. My lazy way. Use Nik Color Efex Pro. Thanks Asher for allowing use of your image. |
|
#3
|
|||
|
|||
|
Asher
are we allowed overlay work on these- how fun is this- Fahim- excellent color work! I do like what you did |
|
#4
|
|||
|
|||
|
Quote:
Go ahead! All work though goes back to the original photographer in OPF when edits are done. I do like your work and it would be a delight. Asher
__________________
Follow us on Twitter at @opfweb Our purpose is getting to an impressive photograph. So we encourage browsing and then feedback. Consider a link to your galleries annotated, C&C welcomed. Images posted within OPF are assumed to be for Comment & Critique, unless otherwise designated. |
|
#5
|
|||
|
|||
|
Good job, Fahim. I like the use of Viveza. What a clever software program for Aperture, Photoshop and even iPhoto!
You have opened up the beauty and I really appreciate your efforts. Thanks! Asher
__________________
Follow us on Twitter at @opfweb Our purpose is getting to an impressive photograph. So we encourage browsing and then feedback. Consider a link to your galleries annotated, C&C welcomed. Images posted within OPF are assumed to be for Comment & Critique, unless otherwise designated. |
|
#6
|
|||
|
|||
![]() Asher Kelman. 2011 ![]() Asher Kelman.2011 I used to different techniques as you can see- original Asher Kelman- overlay of black and white work done with one background a found photo of a simple door lined with newspaper to keep evil spirits away-and some shadow work-color The second transposed and sepia, shadow and a simple picture of some torn paper and wire as an overlay background-the center is sepia focused- Charlotte- |
|
#7
|
|||
|
|||
|
Quote:
It's good to see what is and find what might be. Thanks for your take! Asher
__________________
Follow us on Twitter at @opfweb Our purpose is getting to an impressive photograph. So we encourage browsing and then feedback. Consider a link to your galleries annotated, C&C welcomed. Images posted within OPF are assumed to be for Comment & Critique, unless otherwise designated. |
|
#8
|
|||
|
|||
|
Asher,
thanks for suggesting this - I got trapped by the light / skin / eye.. ended up a nice place to play and confirmed some thoughts I had on white bands.. the work with white for me ! ![]() Asher Kelman.2011 i lightned the face / bw mask / done the colour with and adjustment - unsaturated. cut paste / enlarge ... then white bands on top - then flipped oot. cheers |
|
#9
|
|||
|
|||
![]() Steps (as I recall - took less than 2 min) 1) Duplicated image 2) Copied Green channel to overall image 3) Used bottom image red channel to darken upper image green channel 4) Moved to LAB 5) Used a "Man From Mars" and "Color Boost" actions to add and boost color 6) Flattened and moved back to RGB 7) Duplicated 8) Sharpened eyes and lips 9) Blended top and bottom layers to soften sharpening |
|
#10
|
|||
|
|||
|
Quote:
![]() Asher Kelman.2011 Mark, The deconstruction and rebuilding is original and impressive. Thanks! Asher
__________________
Follow us on Twitter at @opfweb Our purpose is getting to an impressive photograph. So we encourage browsing and then feedback. Consider a link to your galleries annotated, C&C welcomed. Images posted within OPF are assumed to be for Comment & Critique, unless otherwise designated. |
|
#11
|
|||
|
|||
|
Quote:
You would have loved Kodachrome! You work here brings in a lot of rich color, so different from the take of Fahim and Mark. Thanks for the contribution! Asher P.S. where on earth did you come across the "Man From Mars" and "Color Boost" actions?
__________________
Follow us on Twitter at @opfweb Our purpose is getting to an impressive photograph. So we encourage browsing and then feedback. Consider a link to your galleries annotated, C&C welcomed. Images posted within OPF are assumed to be for Comment & Critique, unless otherwise designated. |
|
#12
|
|||
|
|||
|
Quote:
Actions: The Picture Postcard Workflow Action Set Dan Margulis is teaching a course in Toronto, Canada in mid April 2012. If you want more information: Adobe Photohop CS5 Colour Correction Michelle Lafreniere DPA Communications Corp. 439 University Avenue, Suite 1150 Toronto, ON M5G 1Y8 (416) 205-9604 1-800-269-5742 |
|
#13
|
|||
|
|||
|
I have Margolis' book, Kevin. However it's not light reading, LOL.
I had no idea he taught at workshops or made these actions. I'd not imagined he'd do that. He seems so academic! Asher
__________________
Follow us on Twitter at @opfweb Our purpose is getting to an impressive photograph. So we encourage browsing and then feedback. Consider a link to your galleries annotated, C&C welcomed. Images posted within OPF are assumed to be for Comment & Critique, unless otherwise designated. |
|
#14
|
|||
|
|||
|
Charlotte, me like #1 and #2 from you.
Best. |
|
#15
|
|||
|
|||
![]() Asher Kelman: Lingerie Edited by Bob Rogers I frequently do something along these lines when the original is soft. Steps: duplicate layer To top layer: Filter, Blur, Smart Blur -- mode: overlay edges; quality: high; setting 8.6, 30.7 Opacity 15% To bottom layer: Filter, Artistic, Poster Edges: Settings 1,2,1 I was actually planning on posterizing the bottom layer and blurring it, when I hit the poster edges filter by mistake and decided I liked the look even better. |
|
#16
|
|||
|
|||
|
Thanks, Bob! Any skilled darkroom photographer would raise his/her eyebrows off their heads with such work! This is really making a picture work beyond what's written by the electrons into the sensitive medium so when does photography fall by the wayside? Still, I must admit I do appreciate your transformation a lot as it reduces the gap between real and fantasy and that's the object of fashion and dress. We see a superficial covering which helps us ignore the simplifications and inexactness of the plastic manneqquin as well as any few faults there are in the actress. So I like your work and doing what you did now seems an obvious path to take. Could we do that in the darkroom? I bet someone could, but not I! ![]() Asher
__________________
Follow us on Twitter at @opfweb Our purpose is getting to an impressive photograph. So we encourage browsing and then feedback. Consider a link to your galleries annotated, C&C welcomed. Images posted within OPF are assumed to be for Comment & Critique, unless otherwise designated. |
|
#17
|
|||
|
|||
|
Asher,
Thank you for your kind words. Anymore, I spend a lot of time doing graphic arts kind of stuff. To me, whether it's photography, illustration, or some merger of the two, it's all about proportion and balance. A logical next step might be to isolate the model and the manneqquin and create a new background. A friend of mine did a lot of posterization in fine arts classes through silk screens. Sounds like a fun way to transform photographic images -- he would make copies of the negatives onto kodalith at various exposures, and then print the liths onto the screens. |
|
#18
|
|||
|
|||
|
Quote:
For the benefit of others, here's the two books that Asher might have been referencing: Professional Photoshop: The Classic Guide to Color Correction (5th Edition) [Paperback] Photoshop LAB Color: The Canyon Conundrum and Other Adventures in the Most Powerful Colorspace [Paperback] Please note that an Amazon affiliate link has been embedded. If you go to Photoshop World, you can catch Dan Margulis there. Or, you can view his videos at Kelby Training. I hope this information is helpful. As an aside, my version was extremely quick. If one were doing this for real, then more care would be taken on the flowers and other parts of the picture. Instead, I just wanted a more lively picture, a Kodachrome version. |
|
#19
|
|||
|
|||
|
Hi Asher,
I couldn't resist the temptation of playing with this photo. I thought giving it a more edgy look and emphasize the model's presence. Here's a quick sketch with the PP used. I hope you like it! Asher Kelman: Window, Weitzman Shoe Store Edited by Ruben Alfu 1. Distort image (Lens Correction) 2. Composite metal frame 3. Add Levels Adj. layer, Difference mode 4. Play with levels and Blend if in Adj. Layer 5. Merge visible - New layer, Linear Light Mode 6. Adjust Transparency and Blend If in new layer to control contrast Regards, Ruben |
|
#20
|
|||
|
|||
|
Quote:
Asher Kelman: Window, Weitzman Shoe Store Edited by Ruben Alfu Thanks, Ruben, I'm glad I noticed this today. I like the bolder impression Caitlin gives in the bowed window. Great idea! I'd never have thought of that. Asher
__________________
Follow us on Twitter at @opfweb Our purpose is getting to an impressive photograph. So we encourage browsing and then feedback. Consider a link to your galleries annotated, C&C welcomed. Images posted within OPF are assumed to be for Comment & Critique, unless otherwise designated. |
|
#21
|
|||
|
|||
|
Asher - thanks - i think it may need a slight bump in contrast and also lip work!
|
|
#22
|
|||
|
|||
|
[QUOTE=Asher Kelman;123834]
![]() Asher Kelman.2011 Mark, As I said, the deconstruction and rebuilding is original and impressive. I omitted one important feature you added light! Even more I realize that this light entering between the fragments is important. Reminds me of the words of "The Anthem" by Leonard Cohen, the chorus of which is Ring the bells that still can ring Forget your perfect offering There is a crack in everything That's how the light gets in. Listen to the song here! Let the light in! Asher
__________________
Follow us on Twitter at @opfweb Our purpose is getting to an impressive photograph. So we encourage browsing and then feedback. Consider a link to your galleries annotated, C&C welcomed. Images posted within OPF are assumed to be for Comment & Critique, unless otherwise designated. |
|
#23
|
|||
|
|||
|
[QUOTE=Asher Kelman;123975]
Quote:
beautiful song.. thanks for it ... and yes - the light is the main point... the crack is thought to me. * |
|
#24
|
|||
|
|||
|
I hope it is alright to play with this photo since the thread is from last year but I've been looking up old threads and the weather is stormy out, I'm bored and this felt like it would be fun to attempt. If it is okay, I may attempt some of the other ones. :-)
I hope you like my attempt, Asher. ![]() To me the image was all about her eyes and her stare and I loved that there was light coming from behind her and wanted to emphasize that. My procedure: -dupe - hue/saturation set to colorize, pulled to the blue and almost completely desaturated to leave it almost black and white with just a tinge of the bluish tone. - Cleaned out the background and exchanged it with white - cropped off the top of the image - Added a white gradient coming in from the upper left to accentuate the light source from behind. I wanted to blow out the corner and highlight her hair. - Ctrl J an orchid to replace the bottom one which was a bit over-exposed. -Selectively screen the lower portion of her beautiful eyes to make them really intense and selectively multiply pupils and contour of the iris. - Some selective dodge to accentuate the light on her face - High pass filter set to soft light on her eyes and lips only
__________________
there's a crack in everything; that's how the light gets in ~Leonard Cohen my website |
|
#25
|
|||
|
|||
|
Thanks Maggie for making the picture work! did you read the poem too?
Asher
__________________
Follow us on Twitter at @opfweb Our purpose is getting to an impressive photograph. So we encourage browsing and then feedback. Consider a link to your galleries annotated, C&C welcomed. Images posted within OPF are assumed to be for Comment & Critique, unless otherwise designated. |
|
#26
|
|||
|
|||
|
Quote:
There have been intense storms here all day and I had to shut down for a bit but have done another one since. Again, I enjoyed playing with the light. The original: ![]() and when I saw it I loved the light on the left and tried to accentuate it and accentuate the lines from the bottom right and left to pull the eye toward the cow and her face. so I did this: ![]() - dupe of course (and merging in between but always keeping the original free of edits) -Multiply and selectively darken the right side (to us) of her face and the shadows on her fingers and some touches on her jacket. -screen, eyes a bit, parts of the hair, and lines of the jacket and the fingers to create leading lines towards her face and the cow beneath it. - added a texture set to multiply, mask out with a gradient mask and mask out the face and jacket etc., too. -added the same texture but inverted it (turns a bluish color) then hue/saturation to a ocher type tone and then set that to screen and use a layer mask and bring it back only on the wall on the left side. These are so much fun to do so thank you for providing them for us to play!
__________________
there's a crack in everything; that's how the light gets in ~Leonard Cohen my website |
|
#27
|
|||
|
|||
|
Quote:
The multiply, I'd use but didn't think of here and the screen, I don't use, often at all. Tell me why you chose it and what makes it work so well here? Where did you get the texture? Asher
__________________
Follow us on Twitter at @opfweb Our purpose is getting to an impressive photograph. So we encourage browsing and then feedback. Consider a link to your galleries annotated, C&C welcomed. Images posted within OPF are assumed to be for Comment & Critique, unless otherwise designated. |
|
#28
|
|||
|
|||
|
Maggie,
I've started a new thread devoted to your spark of great ideas using special blending modes and textures to give a picture a great finish and presence. I commend your work and hope others will equally share their own ideas too here
__________________
Follow us on Twitter at @opfweb Our purpose is getting to an impressive photograph. So we encourage browsing and then feedback. Consider a link to your galleries annotated, C&C welcomed. Images posted within OPF are assumed to be for Comment & Critique, unless otherwise designated. |
|
#29
|
|||
|
|||
|
Asher,
Ever the gentleman, thank you. I didn't mean to impede on your thread, just wanted to show why I would choose to use something like a texture. Basically, it is important that people shouldn't use them to disguise a bad image, instead to enhance a certain feeling. Your images were great to start with and were a lot of fun to play with. Thanks for giving me the opportunity, especially since this thread was started ages ago. /maggie gently bows out, :-)
__________________
there's a crack in everything; that's how the light gets in ~Leonard Cohen my website |
|
#30
|
|||
|
|||
|
Just being my crazy self. I just carried on with the already ragged edges - added to them - and made a cutout. I pulled the exposure way down (except for on the girl) and applied a 3 color gradient (orange, blue, pink) onto that layer. I sampled one of the brown colours from the center of the layer to use as the background color and then overlayed the other closer up shot of the same scene. Added a few strips of highlight from angle to angle. Ran the whole thing through Nik ColorEfex Pro Duplex Filter.
![]() ![]() Rob
__________________
A Creative Edge in Photography by Robert Watcher : www.robertwatcher.com Travel Virgins - Adventures in Travel by Rob & Anne Watcher : www.asifweknow.com Mirrorless Travel Photographer : Traveling Light and Shooting Heavy : www.plus.google.com |
![]() |
| Bookmarks |
| Thread Tools | |
| Display Modes | |
|
|
Similar Threads
|
||||
| Thread | Thread Starter | Forum | Replies | Last Post |
| Photoshop masks - the "transparency" metaphor | Doug Kerr | Image Processing and Workflow | 2 | May 23rd, 2011 02:41 PM |
| Photoshop - drawing pixel masks | Doug Kerr | Image Processing and Workflow | 22 | May 18th, 2011 11:19 AM |
| pixels or PIXELS?? | Christopher Stockman | Imaging Technology: Theory, Alternatives, Practice and Advances. | 11 | June 20th, 2007 09:35 AM |