• Please use real names.

    Greetings to all who have registered to OPF and those guests taking a look around. Please use real names. Registrations with fictitious names will not be processed. REAL NAMES ONLY will be processed

    Firstname Lastname

    Register

    We are a courteous and supportive community. No need to hide behind an alia. If you have a genuine need for privacy/secrecy then let me know!
  • Welcome to the new site. Here's a thread about the update where you can post your feedback, ask questions or spot those nasty bugs!

Holliday snap challenge

Ivan Garcia

New member
I like this new section of the forum, for us still learning, is a great resource.
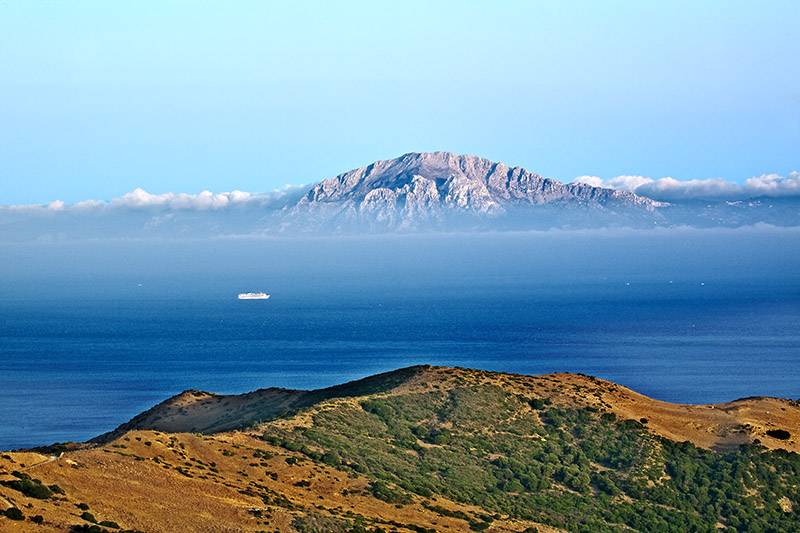
So here is my challenge. This is a view of Ceuta (Africa) from Tarifa (Spain) as you can see is full of sensor dust and haze. See what you guys can do with it.
A larger version can be found HERE
IMG_4188untuched.jpg


This is my version, I like it, but a lot of foreground detail was lost in the process. So the challenge is, can you get rid of the haze, improve tonality, and keep detail...
IMG_4188V3.jpg
 

Brian Lowe

New member
Here is my version of the photo.

I processed the photo with Adobe LightRoom B4, adjusting the colors. Then into PhotoShop where a ran my Gothic Glow action to give it a dreamy look and lastly cropped the photo.

Enjoy,
Brian


Photo by Ivan Garcia
98195392-L.jpg
 

Asher Kelman

OPF Owner/Editor-in-Chief
Brian, does it have to be cropped? That's an hones question as I have not worked with the image. How did it look before cropping or did you do that as the first step?

Asher
 

Ivan Garcia

New member
Hi Brian.
I like your take on my picture, and I thank you for your efforts, you have brought magic to my shot, but, as Asher says, could we see the un-cropped version? Also (and forgive me for being cheeky here) any chance of sharing/selling your wonderful Gothic Glow action?

Common guys is a very nice shot to work with (forgive me for saying so myself) and Brian has put the benchmark quiet high... lets see other takes on this one :)
 

Don Lashier

New member
Here's my straight-up take. Got rid of a lot of the haze but not all. Once the three basic layers are created, together with associated adjustment layers, all sorts of interpretation possibilities are opened, which I'll leave as an exercise for the reader ;)

tarifa-0.jpg


and the layer palette - should be mostly obvious but if you have questions I'll elaborate.

tarifa-layers.jpg


a little contrastier version, still pretty straight-up
tarifa-1.jpg


btw this was done on my uncalibrated LCD in my office, hope it looks ok at home!

- DL
 
Last edited:

Brian Lowe

New member
Ivan Garcia said:
Hi Brian.
I like your take on my picture, and I thank you for your efforts, you have brought magic to my shot, but, as Asher says, could we see the un-cropped version? Also (and forgive me for being cheeky here) any chance of sharing/selling your wonderful Gothic Glow action?

You can get the Gothic Glow action from http://www.atncentral.com/ look for the downloads and you'll find the Gothic Glow action.

Common guys is a very nice shot to work with (forgive me for saying so myself) and Brian has put the benchmark quiet high... lets see other takes on this one :)

Well...... I didnt save a uncropped version. The reason I cropped the photo in the first place I did not like the bottom right part of the photo it looked like black spots on the side of the hill and it distracted from the shot, at least in my mind. Then when I looked at it I decided to take some of the sky out too.

My vision was the lonely Cruise ship traveling a vast ocean, making one wish they were on the ship enjoying the experience of an ocean liner at sea.


-Brian-
 

Ivan Garcia

New member
Brian
And a very nice vision it was too. :).
Thank you for the link, the action is now part of my little collection.

Don.
Nice straight take on the picture, don't be afraid to experiment, I like to see your vision for the shot, unlike some artist, and I don't get offended if my "intended view" is challenged and/or improved.
Your layers palette looks complex to me (I achieved my version by simple layer mask and levels) could you be as kind as to elaborate?.
Please let me know if you guys need the original RAW file, if so, I'll be happy to upload it to my server.
Ps: Common Asher ... I know you are working on it... Let me see it, don't make me suffer :)
 

Tim Armes

New member
Hi Ivan,

There are lots of haze reduction techniques. The haze itself is in the blue layer, so a technique that often works well is to create a channel mixer layer and increase the red/green proportions in the blue channel (and decrease the percentage of blue). If this produces a good result then its a neat solution since the correction is restricted to a simply adjustment layer. It can however cause unwanted colour shifts.

As already mentioned, another solution is to use a high radius unsharp mask on a copy of the layer. This is the technique that I've applied in my attempt:

IvanGarcia1.jpg


I applied a graduated fill to the layer's mask so as to apply the effect more at the top of the image than the bottom. I masked out the sky since there was a fair bit of noise in the image that became evident.

Finally I increased the constrast in the mountain and sharpened for screen output.

I haven't played with the colours since that's a different topic.

Tim
 

Asher Kelman

OPF Owner/Editor-in-Chief
These are getting more and more impressive.

That mist itself is part of the magic and I'm glad it is still there in the end!

Good work Don, Brian and Tim. This is a hard pciture but it is a great picture because we know that the scene has to be more enchanting than the initial image, but that's tough to pull off. I like the fact that Tim did not lose the grass in the foreground. It is difficult sometimes.

I'm sure that your image was perfect on your uncalibrated screen, Don. The logic of your approach is straightforward.

Asher
 

Don Lashier

New member
Ivan Garcia said:
Don.
Nice straight take on the picture, don't be afraid to experiment, I like to see your vision for the shot, unlike some artist, and I don't get offended if my "intended view" is challenged and/or improved.
Your layers palette looks complex to me (I achieved my version by simple layer mask and levels) could you be as kind as to elaborate?.
Ivan, my PS version is on my work computer across town so any other visions will have to wait til tomorrow.

AFA the adjustment layers, I divided the image into three zones, sky, clouds/far shore/water, and near shore. These are represented by the three image layers "layer 1", "layer 1 copy" and "layer 1 copy 2" (near to far). Actually there are two additional subzones but these are done using masks on adjustment layers rather than separate image layers. These additional separations are the "haze" zone and the far shore/clouds. Here's a description of each layer as it appears in the palette (palette repeated below). Note that they're in clipping groups:

= sky group
- hue/saturation, to give the sky some color
- curves, gamma curve to darken the sky
- layer 1 copy 2, sky layer, mask created by temp layer lightened, magic way, brush cleanup
= curves 3 - overall contrast, affects bottom two groups (everything but the sky), don't remember the shape without looking but probably S form.
= clouds/far shore/water group
- curves 2 - haze cleanup contrast curve, S form, masked
- curves 1 - haze cleanup negative gamma (darkening) curve (both curves are masked, mask created using mirror gradient tool)
- curves 6 - contrast increase (S form) curve masked for the clouds and far shore, mask created with spray gun
- layer 1 copy, masked to exclude the close shore. mask created from temp layer, brightened, magic wand, contrasted, gaussian blur around 25
= curves 5, contrast for near shore, probably an S curve
- layer 1, base image. Due to above layers only the near shore shows (no mask required)
= background (superflous(hidden)) but I usually leave as a handy way to create border color (by canvas expansion) before saving as jpeg.

tarifa-layers.jpg


Note that everything is non-destructive allowing infinite tweaking. The three actual image layers are all unaltered copied from your original post. Additonal adjustment layers could be added if desired, either globally (on top), affecting everything from a given point down (ala curves 3), or as part of a clipping group only affecting one of the three zones (or with copied masks the two additional subzones).

Also note that it is somewhat arbitrary as to whether you isolate zones by masking adjustment layers or by masking copies of the actual image. I have mixed these methods above. Since all three copies of the image in the stack are identical, it could have all been done with a single base image and masked adjustments. If I have the raw image (you hadn't posted it yet) I would tend to convert 3 times for basic tonality and thus have three different base images, but since I was working from a jpeg I chose to leave the base images unaltered (to preserve editability), but habit led me to dup them rather than just applying all as masked adjustments to a single base image.

IMO using the raw approach generally gives better results. For instance, I had "splotching" problems in the sky (cured with a quick blur tool application) which wouldn't have occurred using multiple raw conversions. Just noted I did a poor job in cleaning up the sky.

When going for "creative" interpretations, I usually do a "straight-up" composite first, just to get the tonality zones isolated and appropriate masks created. It's then easy to add additional adjustment layers or tweak existing ones, or if done with multiple raw conversions, reconvert and slide in a replacement image for a particular zone.

I agree with Asher that the image has potential without haze removal. That was my initial impulse but you suggested haze removal so I gave it a shot. Note that since my haze removal is entirely on two adjustment layers, it can easily be toggled off. Also note that the haze removal could have been done with a single curve, but separate gamma and contrast curves makes the adjustment and any subsequent tweaking more straightforward.

btw, this all took about 45 minutes (I was in work avoidance mode).

- DL
 

Dierk Haasis

pro member
May I ask why everybody, including the original poster, removes the haze?

Without delving into it - after a long day in Cologne I have to catch up with a lot of things - I'd just make the forground grass greener and perhaps sharpen it very slightly to have a better contrast between back-/middle- and foreground [on two levels, sharpness and colour saturation].
 

Asher Kelman

OPF Owner/Editor-in-Chief
Dierk Haasis said:
May I ask why everybody, including the original poster, removes the haze?

Without delving into it - after a long day in Cologne I have to catch up with a lot of things - I'd just make the forground grass greener and perhaps sharpen it very slightly to have a better contrast between back-/middle- and foreground [on two levels, sharpness and colour saturation].
As I said above:

"That mist itself is part of the magic and I'm glad it is still there in the end!"

The idea I think is to maintain the mist to the extent needed to give the best interpetation of the idea in your head you want to express.

Asher
 

Tim Armes

New member
Dierk Haasis said:
May I ask why everybody, including the original poster, removes the haze?

Without delving into it - after a long day in Cologne I have to catch up with a lot of things - I'd just make the forground grass greener and perhaps sharpen it very slightly to have a better contrast between back-/middle- and foreground [on two levels, sharpness and colour saturation].

Hi Dierk,

The reason's simple. The original poster asked:

"So the challenge is, can you get rid of the haze, improve tonality, and keep detail..."

So we are responding to the OP question and explaining our workflow. That's the whole point of the retouching forum!

This probably isn't the best place to discuss other interpretations since the image workflow forum serves that purpose. Whether or not the haze should be removed won't help people learn how to do it.

Tim
 

Ivan Garcia

New member
Nice work guys.
Don, thank you for taking the time to explain the layers palette (I am not sure I understood it all, a bit too advanced for me).
You are all welcome to do your interpretation of the image (with or without the haze).
Something very odd has just happened, I was about to upload the RAW file so that you guys have a better file to work with, but is gone... I had the raw file opened with CS2 and I still have the .xmp file but my raw is gone… very odd, any way, you can find the next RAW file in the series (same picture but underexposed) Here

Tim, the picture was taken at iso 100, you mentioning noise; this has been worrying me for a wile now.
Is this normal? I mean, every one is praising the EOS 5D for its noise performance, but all of my images suffer terribly with noise (even at iso100 like this one). I have taken the camera to canon UK, but they say “is within manufacturer specification”.
Any one with EOS 5D experience, please let me know if my camera is faulty.
I know this is off topic, but I know some of you have used the 5D, and since Tim mentioned noise, I though you guys viewing/re-touching my image may help
 
Last edited:

Tim Armes

New member
Ivan Garcia said:
Tim, the picture was taken at iso 100, you mentioning noise; this has been worrying me for a wile now.
Is this normal? I mean, every one is praising the EOS 5D for its noise performance, but all of my images suffer terribly with noise (even at iso100 like this one). I have taken the camera to canon UK, but they say “is within manufacturer specification”.
Any one with EOS 5D experience, please let me know if my camera is faulty.
Hi Ivan,

The JPEG that you posted looks clean to me. It's the postprocessing that I performed that bought out noise.

The reason for this is simple - the JPEG is a 8-bit gamma corrected file. Post-processing JPEGs can result in all sorts of unwanted side effects such as these. For best quality images one should:
  • Shoot in RAW
  • Get the image as close to the final version as possible using a RAW converter
  • Make sure that the conversion result in a 16-bit file in TIFF or PSD format
  • Continue the post processing in Photoshop in 16 bit mode
The final image can be happily converted to a 8-bit JPEG for distribution.

I didn't ask for the original RAW image since my objective was simply to demonstatrate a technique for haze removal, as opposed to providing a finished product. So don't worry, I'm sure that your 5D can deliver great noise free images.

Tim
 

Ivan Garcia

New member
Thank you Tim, you have put my mind at rest.

This image is the result of the lessons I have learned here today
As I have some how lost my original file (raw file) this is the resulting jpg from the RAW file available in my server (see previous post)
Tarifa.jpg

And this is how my layers palette looked like
palette.jpg


I can’t thank you guys enough…
I have decided to follow Asher’s advice and leave some of the haze in the image.
My next challenge is to get the background rock colour to match (as close as possible) the foreground. Once this is done the picture will be what I envisioned when I took it.
 

Dierk Haasis

pro member
Tim Armes said:
The reason's simple.

Well, my question included the intention of the OP, which is why I emphasised him in a apposition [gosh, I hope I got that one right]. Perhaps I am interested too much in the whys?!
 

Don Lashier

New member
Ok Ivan, here's a more creative one with the haze left in, and the far mountains colored similarly to foreground as you suggested. Was just a matter of adding a couple more curves layers and tweaking existing ones (and turning off the two haze removal ones, of course).

tarifa-800-5w.jpg


- DL
 

Ivan Garcia

New member
WOW Don... I am there again...Thats very close to what it looked like in my head. It looks beautiful... I know I am a bit of a pain ..but.. could you elaborate on what you did?....so much to learn ...so little time
Thank you
IGD
 

Don Lashier

New member
Ivan Garcia said:
WOW Don... I am there again...Thats very close to what it looked like in my head. It looks beautiful... I know I am a bit of a pain ..but.. could you elaborate on what you did?....so much to learn ...so little time
Thank you
IGD
Glad you like it Ivan. If you give me permission to put in on my adjustment examples page I'll write up a detailed explanation, but probably not until this weekend.

- DL
 
A Silkypix 3 beta version from the underexposed RAW file:
- Color ballance and color adjusted in SP
- PS & Lightmachine local contrast
- PS spot removal
- PS & Lightmachine color adjustment of the sky

Photo by Ivan Garcia
254437711_9397b896a9_o.jpg


BR/ Stefan Hellstrom
 

Asher Kelman

OPF Owner/Editor-in-Chief
Stefan,

I like your attention to the foreground. The green is helpful. I like the persitant mist. That's so important.

What about the middle ground? How should we see that?

Asher
 

nicolas claris

OPF Co-founder/Administrator
Impressive work of all! Though I'm (should I say, once more?) with Dierk about haze…
I'll try to give it a try a little late as my working days are really long nowadays.

However, It is funny as NOBODY did put the horizon (see the African shore line)…horizontal!
It would improve the dynamic of the image. IMHO.

Ivan, I know that place, been a lot of times looking at Gibraltar straight (also sailed it numerous times), it is a truly MAGIC place and a real photo work can be done there, landscape, social… and surfers as well
 

Don Lashier

New member
Nicolas Claris said:
However, It is funny as NOBODY did put the horizon (see the African shore line)…horizontal!

I am sensitive to level horizons (and am the one that hounded PhaseOne until they incorporated image rotation tool), so I thought about it but it didn't exceed my anality threshhold. I used to meticulously level all my shots with visible horizons but ultimately decided that a little off kilter is not necessarily bad, and in fact might even add. If you look through the landscape challenge thread it seems that I'm not alone. Note that my own personal fav image (sunset tide pool) I consciously chose not to level. I struggled mightingly with this but am obstinately sticking by my decision ;)

- DL
 

Ivan Garcia

New member
My new take on this very challenging image... still not were near perfect but I am getting there
Tarifav1.jpg
.
As you can see I am having trouble blending the shore and the landscape either side of the rock,(is not bad if viewed form a distant of 2 meters or so) but the colours are perfect (for my taste), hard work, but thanks to all your advice, very rewarding, once again, thank you all for you input ... just one more push, and this baby will be born.
Nicolas, it is indeed a magical place, I arrived there driving from Jerez de la Frontera along the bull route, and I did take a few shots along the way, sadly by the time I came down to the beach, the light was gone, and the surfers (kite surfers) were drinking hard, so I decided to give the car keys to my wife and have a little drink myself ;)
I go there every year so roll on summer 07.

This is how my layers palette looked like…
Layersv1.jpg
a lot of hard work. Took me 4h to make the masks, ultimately I am a bit gutted that I did not take better care creating them…
 
My take...
Using Rawshooter created 2 different conversions, one for the foreground and
another for the far mountains.
With PhotoShop mixed the 2 using layer masks, also did a graduated sky filter effect
and some custom curves, cleared the sky noise, rotated 1º and some selective sharpen.
Tried to not make it much artificial, but now as I look to it feels too artificial...

BTW, very difficult to work with the JPG, but with RAW is much easier.
hazeis0.jpg
 

Don Lashier

New member
Ivan Garcia said:
This is how my layers palette looked like… a lot of hard work. Took me 4h to make the masks, ultimately I am a bit gutted that I did not take better care creating them…
Looking very good Ivan!

Masking is an art itself. Bear in mind that you can always edit the masks using the spray gun or other tools such as gaussian blur, contrast, etc. I just wish that you could add adjustment layers to masks so that adjustments were non-destructive.

Also, you can often quickly create (at least a rough mask) by copying the base image to a temp layer then use levels, curves, contrast etc to separate the image parts. You can then either copy the image directly to a mask (ctrl-click (command on mac) the mask before pasting) or use the magic wand or color range selection tools to make a selection which you then use to create the mask using the fill tool.

BTW I just noticed that you actually "cleared" parts of base image copies to isolate the zones. The problem with this is that it's very difficult to tweak the edges, or to make the transitions soft. You're better off to mask the various copies as you can always go back with the spray gun and tweak the mask with black or white, or blur it, to ease the transitions. Also, sometimes it's useful to fade a particular layer/zone, and without the full image on each image layer this may cause problems (transparency showing thru).

- DL
 

Ivan Garcia

New member
Thank you Don.
It is a labour of love (frustrating at times).
I did the masking the old fashion way; lasso tool, high magnification, mouse, and lots of patience. I don’t own a tablet yet, although the wife has (having taken pity on me) given me the green light to purchase one.
You mentioning my “clearing up” on the adjustment layer… well, I had the clouds just right, but the rock looked very pale and bluish, so I reached for the eraser tool, and painstakingly went about deleting some of the stuff, again, frustration settled in quickly, as I know that CS2 must have better tools to do the job, I just don’t know where they are, or how to use them, so I have to work within my (limited) knowledge.
In any case, I am very happy with what I have been able to achieve so far, I only whish that my knowledge of CS2 was more extensive.
I’ll give you idea a go (once I assimilate what you are talking about) I am dog tired as for now, so I’ll give a go tomorrow.
Once again thank you for your kind and generous advice.
IGD
 

Don Lashier

New member
Don Lashier said:
BTW I just noticed that you actually "cleared" parts of base image copies to isolate the zones. The problem with this is that it's very difficult to tweak the edges, or to make the transitions soft. You're better off to mask the various copies as you can always go back with the spray gun and tweak the mask with black or white, or blur it, to ease the transitions. Also, sometimes it's useful to fade a particular layer/zone, and without the full image on each image layer this may cause problems (transparency showing thru).
Sorry about replying to myself, but you can easily convert all your hard work to a masked version:

- To be safe, dup the image and work on the dup. I'll refer to this as the "working" image. Note that I'm using windows kb so for a mac sub command- for ctrl-.

- Create another temp work image the same size - you could do this on a temp layer instead but this may keep things a little easier to keep track of.

- fill the background on the temp image with black

- copy one of the partial image layers from the working image to the temp image. Use copy/paste rather than drag/drop so things align.

- set the transparency protect on the new layer this created on the temp image (checkboard button).

- select all (ctrl-a) and fill the layer with white. Only the non-transparent part should fill.

- dup the base image on the working file and move next to the origin layer.

- add a layer mask to this new layer on the working image (layer, add layer mask, reveal/hide doesn't matter as in the next step we'll replace the layer mask). A second thumbnail (mask) should appear on the layer in the palette.

- flatten the temp image, ctrl-a ctrl-c to copy, then alt-click the mask (all white currently) of the new layer we just added in the working image layer palette. The image should turn white (showing the current mask). Ctrl-V to paste in the mask you created on the temp image.

- delete the origin (partial image) layer which has now been replaced by the masked full image

- relink the newly created layer to the clipping group (adjustments layers above) if required by pointing the mouse at the top border of the new layer and alt-clicking.

== if I haven't made a stupid mistake in my instructions (didn't step thru it as I wrote), the image should look as it did before, but you can now click on the mask and paint black or white with the spray gun, blur, etc., to tweak what shows. Any adjustments in the clipping group should behave as before. There's no doubt some shortcuts that could be taken as almost no one (certainly not myself) knows all the secrets of Photoshop. For instance, you could just build the new image layer stack on the temp image then drag/drop over the adjustment layers and re-create the clipping groups.

btw, does anyone know how to replace the actual image in an existing layer? I can't figure it out but there must be a way.

- repeat the above steps for each of the other image layers. You'll now have a much more tunable layer stack.

Things to note about masks:
- white allows that part of the image to show, black masks it off
- you can paint on or otherwise work on the mask (blur etc.) either while viewing the image or while viewing the mask itself, or both (using QuickMask mode which I won't go into here). The most useful is to paint (usually spraygun, if on edges set quite low 5% or so) or adjust on the mask while viewing the effect on the image. To do this click the mask thumbnail and paint or adjust away. If you alt-click the mask instead you'll be viewing the mask itself which is sometimes useful. Also if you want to copy from or paste to the mask you must be viewing the mask layer (alt-click) before doing so.
- you can also add masks to adjustment layers which will restrict the effect to only the unmasked portion of the image. This is what I did for the haze remove using curves adjustment layers in my first version.
- if you have a hard edge mask constructed it can be very useful to gaussian blue to soften the transition. Use the preview to determine the best setting, but I usually find something fairly wide (10 to 20 pixels) works well.
- Contrast adjustment on the mask can also be useful in certain situations.
- you can often quickly create a mask by making a temp copy or layer of the base image, then posterizing using levels and/or curves, then either directly copy paste to a layer mask on a full normal image, or use the magic wand or color range selection to create a selection, then add a layer mask to a copy of the full image, optionally select either hide or reveal selection when the mask is created.
- the gradient tool is also handy for creating masks. I used this on the haze removal mask, and also used a gradient mask on an curves adjustment layer for the sky in my last version of your image to give some gradient to the sky.

ps: Just checked in PS and I did have ctrl- and alt- crossed up a couple times. Hopefully I got them all corrected now. One of the things that makes it so difficult to learn advanced features in PS is that so many shortcuts (unlike typical apps) have no menu equivalent which means you can't hunt the menus when you're unsure or first learning.

- DL
 
Last edited:
Top